Mette Nielsen | 04/11/2024
3 ways to set up Scheduling+ for hotels
In this article, we explore three ways the hotel industry might use our new appointment booking tool, Mono Scheduling+.
Mono Scheduling+ is designed for service industries such as hairdressers, doctors, real estate, and fitness. However, it can also be adapted to work for motels, b&bs, and small hotels.
In this article, we will explore three different methods for setting up Scheduling+ in a hotel context:
- Method 1: Room as resource, stay duration as service
- Method 2: Room as resource, stay package as service
- Method 3: Room as resource, stay package as a group service
These examples are intended to help you identify the best approach for your client. Use them as inspiration to develop a tailored solution that meets their needs.
Method 1: Room as resource, stay duration as service
- Each room is a resource
- Length of stay is a service
In our first example, we use Timify's resource section to set up each hotel room as a bookable resource. Services are then configured to allow visitors to select the duration of their stay.
Setting up the rooms
In this example, let’s define each room as a resource.
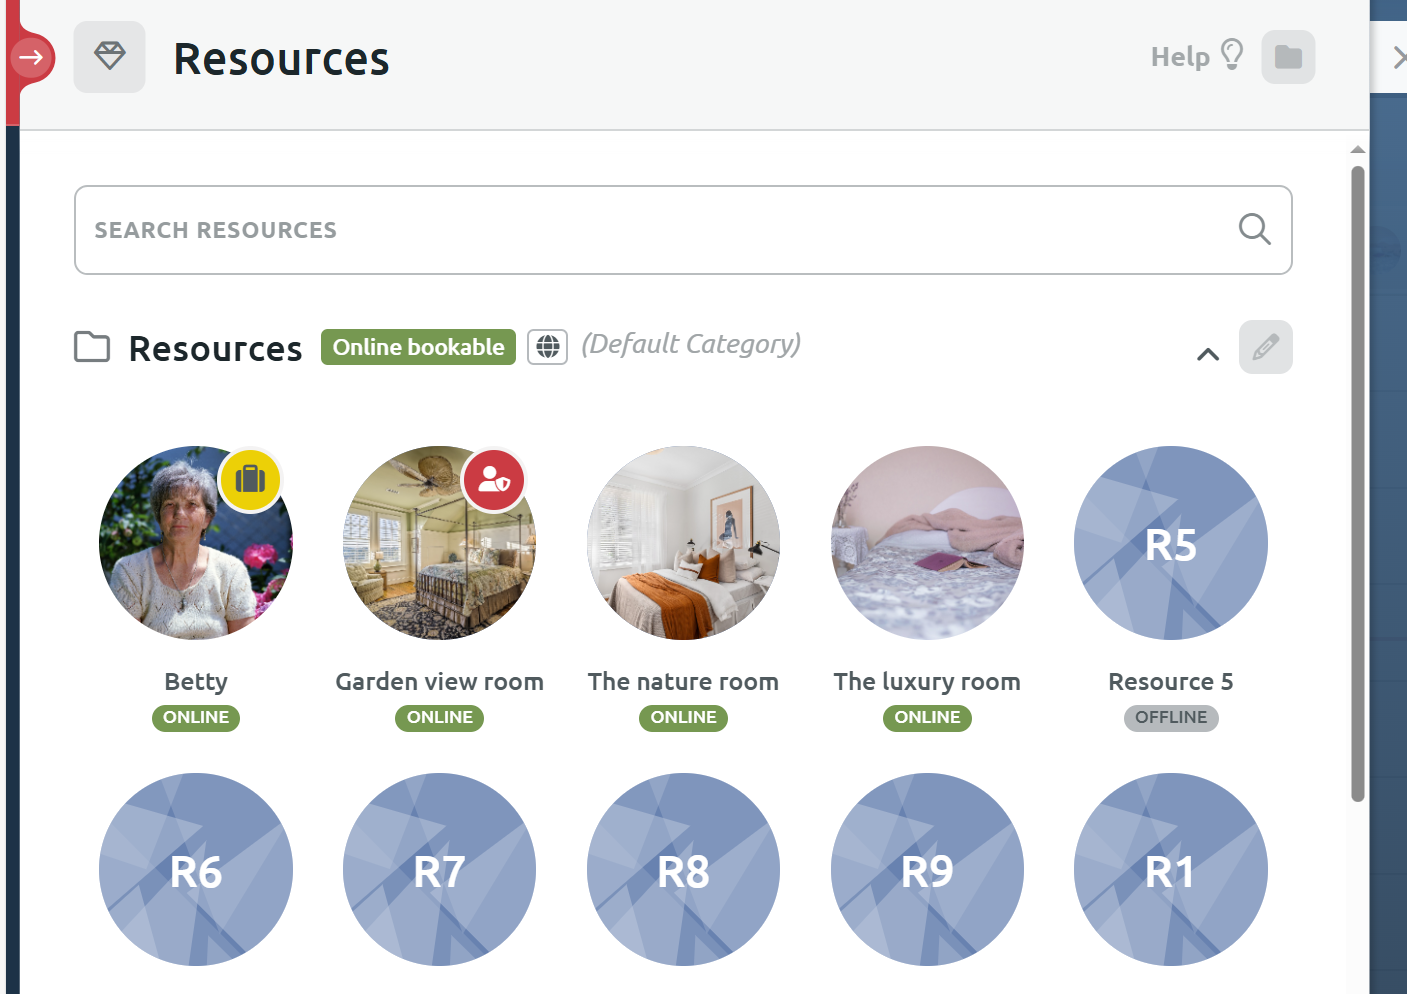
- Navigate to Management > Resources to set up each resource (room).
- Add a thumbnail, so the visitor can easily see which room they are booking
- Set the availability to 00:00 - 00:00.
- Make sure you choose the first 00:00 at the beginning of the dropdown list and the second 00:00 at the end of the dropdown list, to cover the entire 24 hours.
- Tick the box ‘Activate resource for online booking.'
Setting up the stay duration
In this example, let’s use services to define the length of the stay.
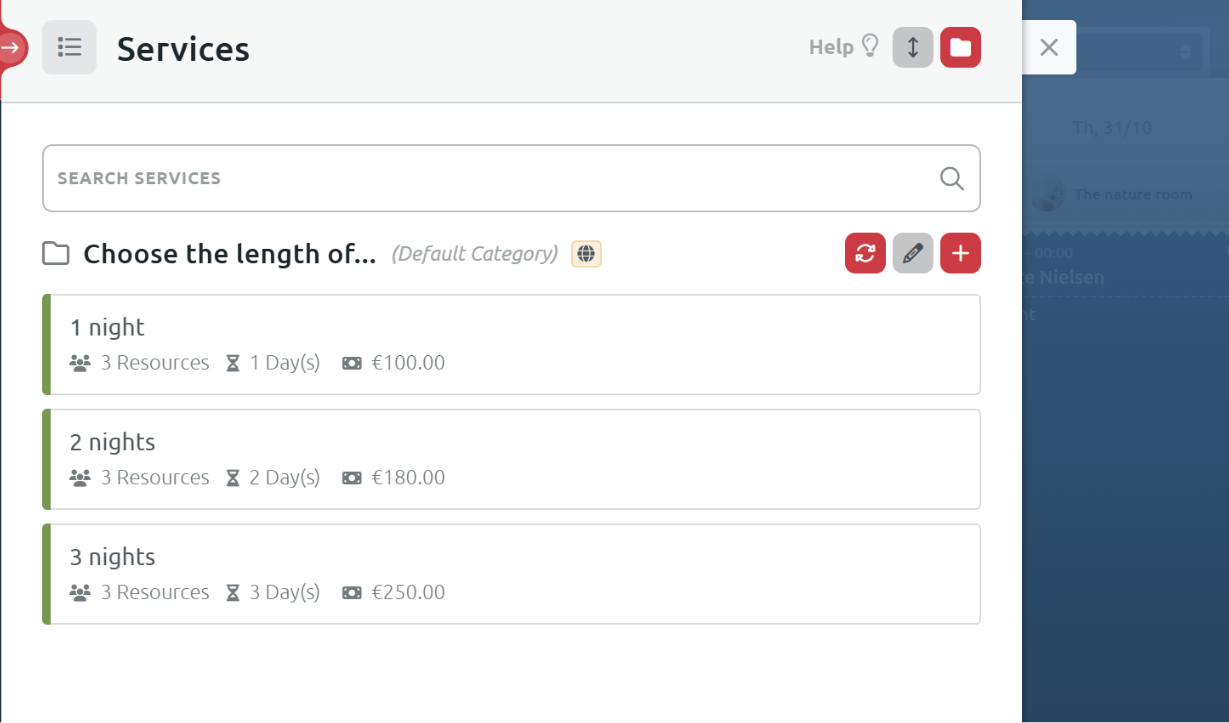
Rename the Service category
- Navigate to Management > Services.
- Click the grey pencil icon to rename the Service Category
- Type out a name, for example 'Choose the length of your stay'. The category name will be displayed above the services in the widget.
Service 1: One night
- Navigate to Management > Services.
- Click the + icon to add a new service and call it '1 night'.
- Next to the service name, change the colour label so that each service has a separate colour. This will make it easier to distinguish the different stays in the calendar later.
- Set the duration of the service to 1 day.
- Choose which resources should be available for the stay. Let’s choose all the resources (rooms). If one room has been booked, only the free one will appear in the booking flow. That way, double bookings are avoided.
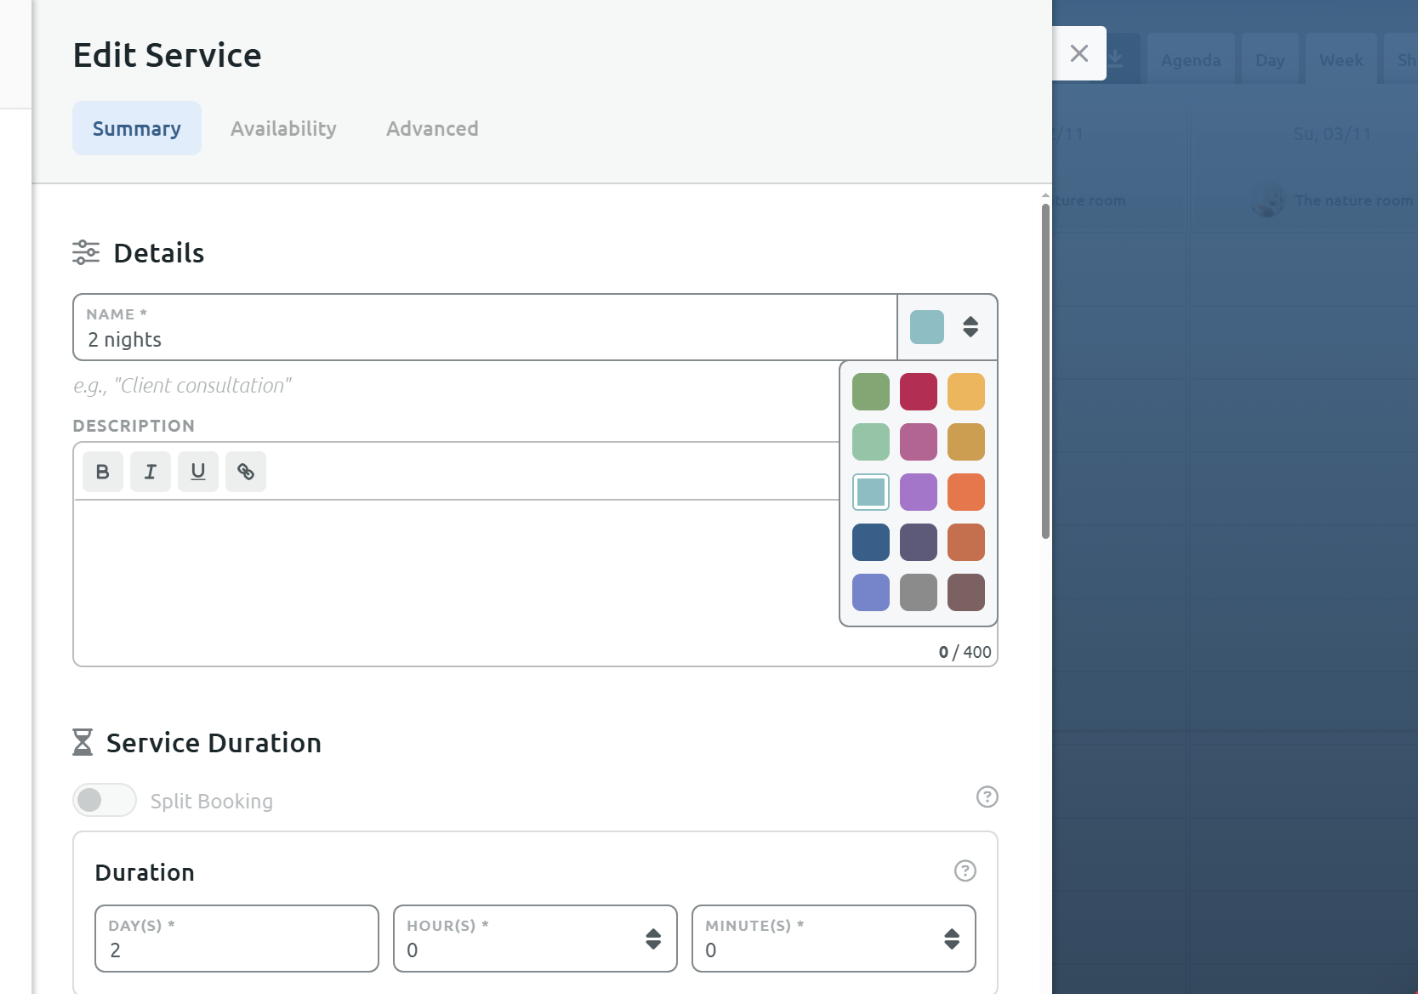
Service 2: Two nights
- Navigate to Management > Services.
- Click the + icon to add a new service and call it '2 nights'.
- Next to the service name, change the colour label so that each service has a separate colour. This will make it easier to distinguish the different stays in the calendar later.
- Set the duration of the service to 2 days.
- Choose which resources should be available for the stay. Let’s choose all the resources (rooms). If one room has been booked, only the free ones will appear in the booking flow. That way, double bookings are avoided.
Add as many additional nights as necessary. You can add an unlimited number of services (nights) regardless of plan.
Hide the duration of service
Consider hiding the duration of the service in the Timify widget, as it displays in minutes. A duration labeled "1500 minutes" for a stay could appear confusing to customers.
- Navigate to Settings > Booking > Booking widget
- Click the Edit icon in the top right corner
- Toggle the Enable switch under Hide Service Duration
Change the Booking Slot Display
You can also consider changing the layout of your service from daily to weekly, so that visitors can view a whole week at a time.
- Navigate to Settings > Booking > Booking widget
- Click the edit button in the top right corner
- Change the setting under Booking Slot Display to Display slots by calendar week.
The booking experience
Let’s take a look at the booking experience using this method.
Choose stay duration. For example, 1 night 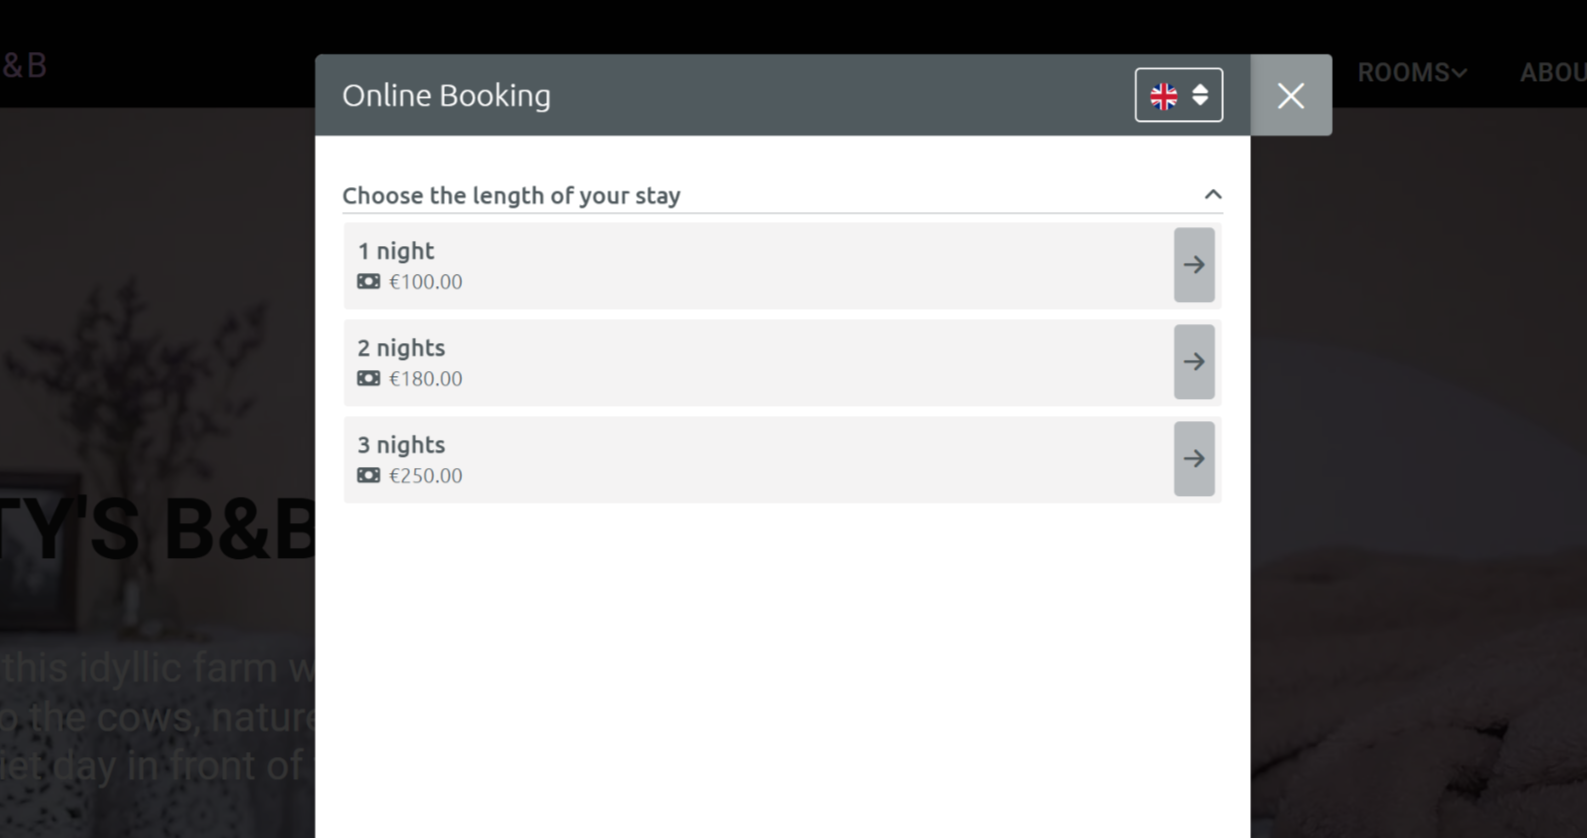
Next, choose the room. For example, the nature room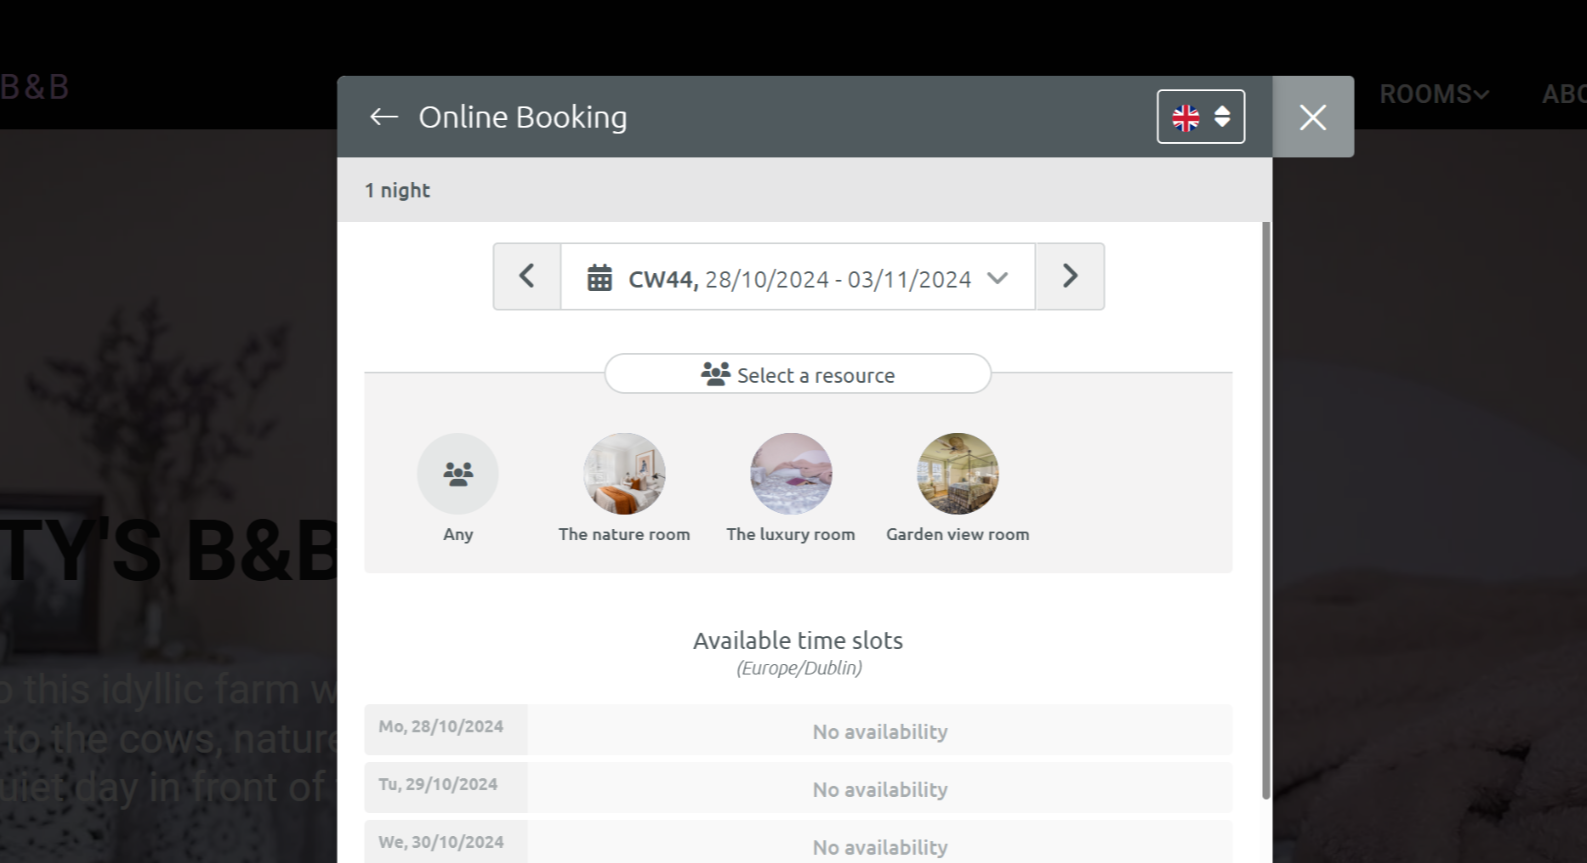
Choose a check-in date. For example, Thursday 31/10 
Add your information and finalise the booking flow. You will then receive an automated confirmation email.
This is how it looks like in the SMB’s calendar:
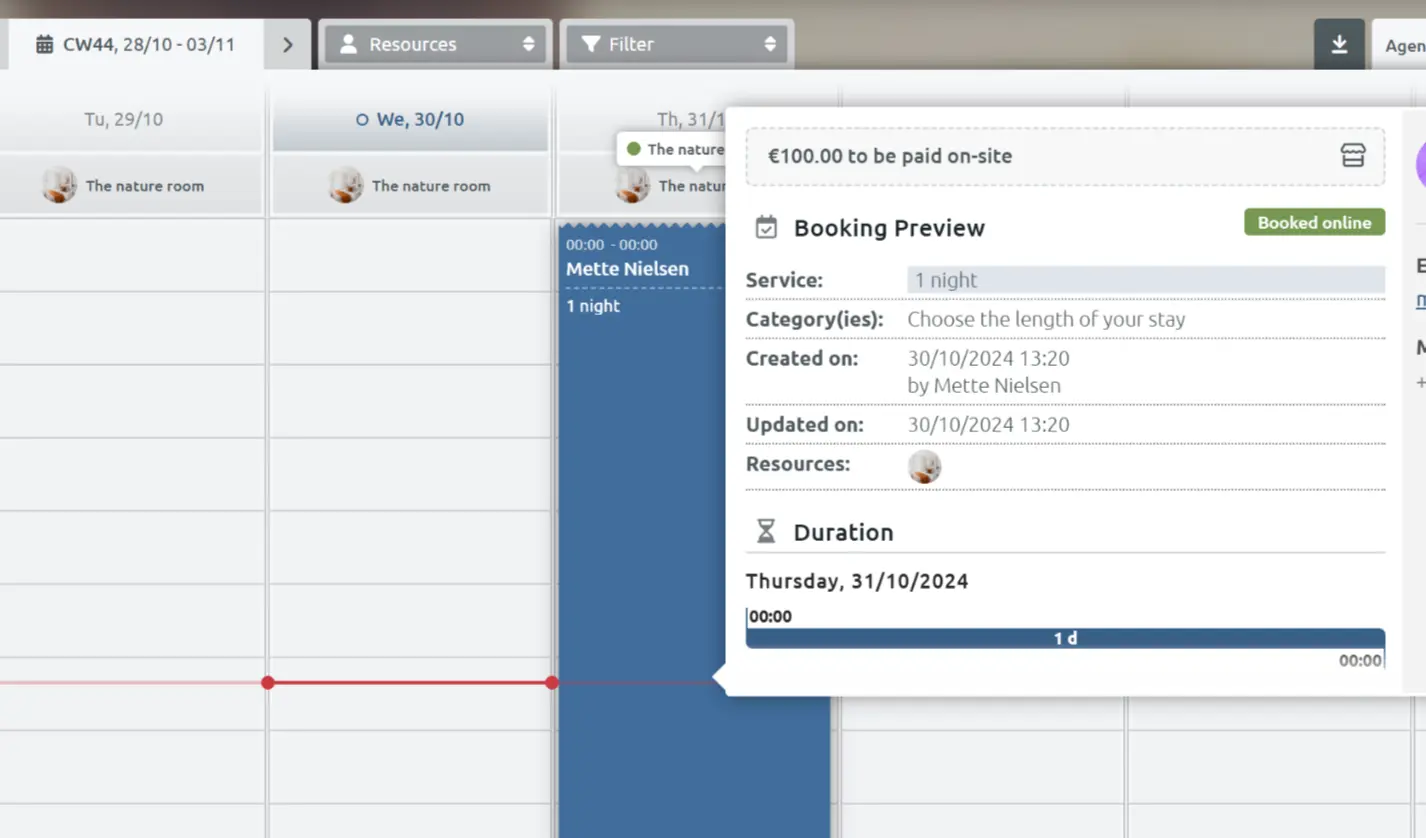
The booking appears only on the selected day (October 31st). However, in this case, the stay would actually extend until the following day (November 1st).
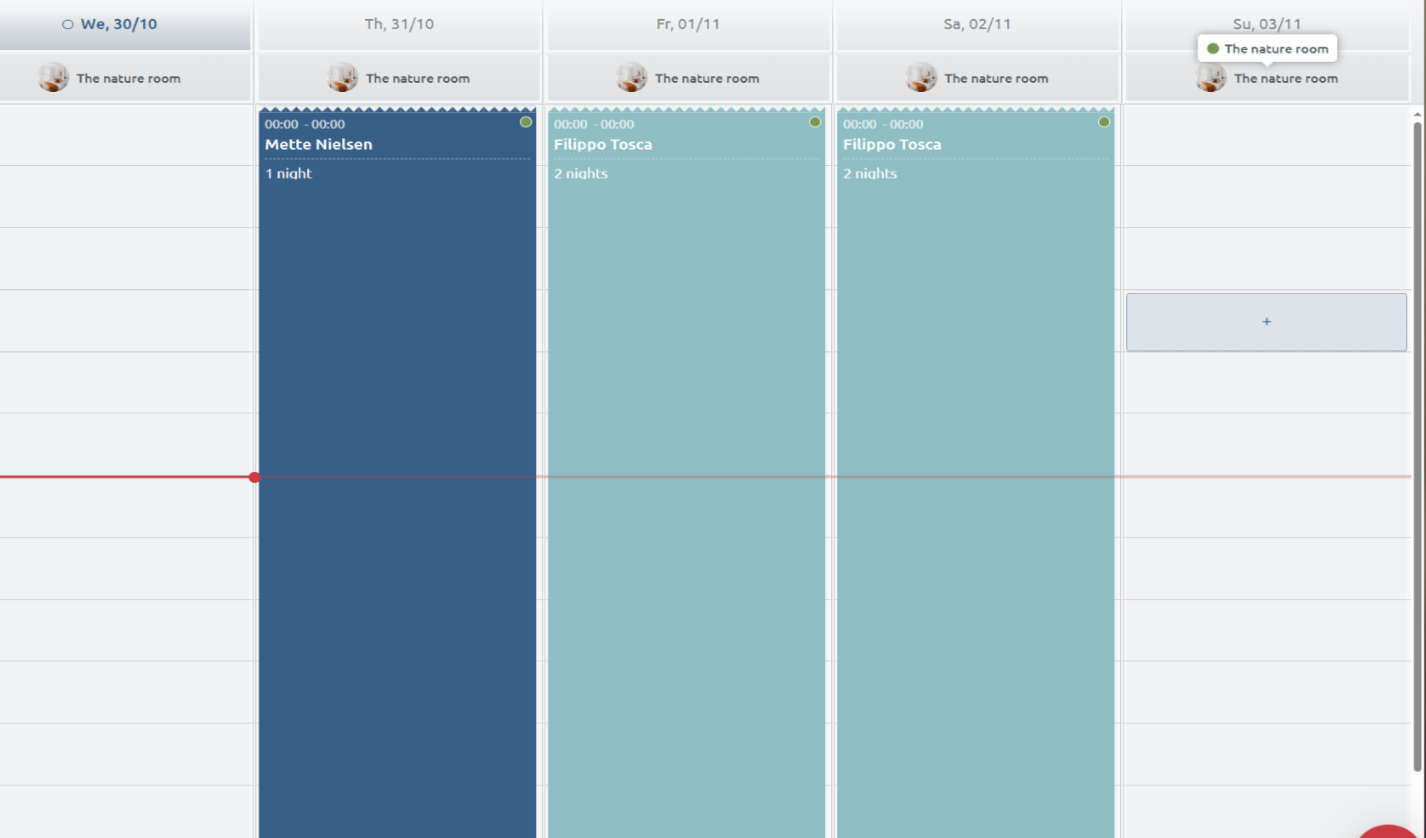
Let’s imagine someone else (Filippo Tosca) books the nature room from the 1st of November for a 2-night stay.
This means that:
- Mette Nielsen (Blue) will check out on the 1st of November
- Filippo Tosca (Green) will check in on 1st of November.
Method 2: Room as resource, stay package as service
- Each room is a resource
- Stay type is a service
This method is suitable for hotels with price variations for each room, who prefer offering packages instead of individual bookings.
Setting up the rooms
The rooms are set up in the same way as the previous example. Each room is a resource.

- Navigate to Management > Resources to set up each resource (room).
- Add a thumbnail, so the visitor can see which room they are booking
- Set the availability to 00:00 - 00:00.
- Make sure you choose the first 00:00 at the beginning of the dropdown list and the second 00:00 at the end of the dropdown list, to cover the entire 24 hours.
- Tick the box ‘Activate resource for online booking.'
Setting up the packages
Packages allow flexibility in price between rooms and allows for more variations. You could for example offer a stay with breakfast or bike hire.
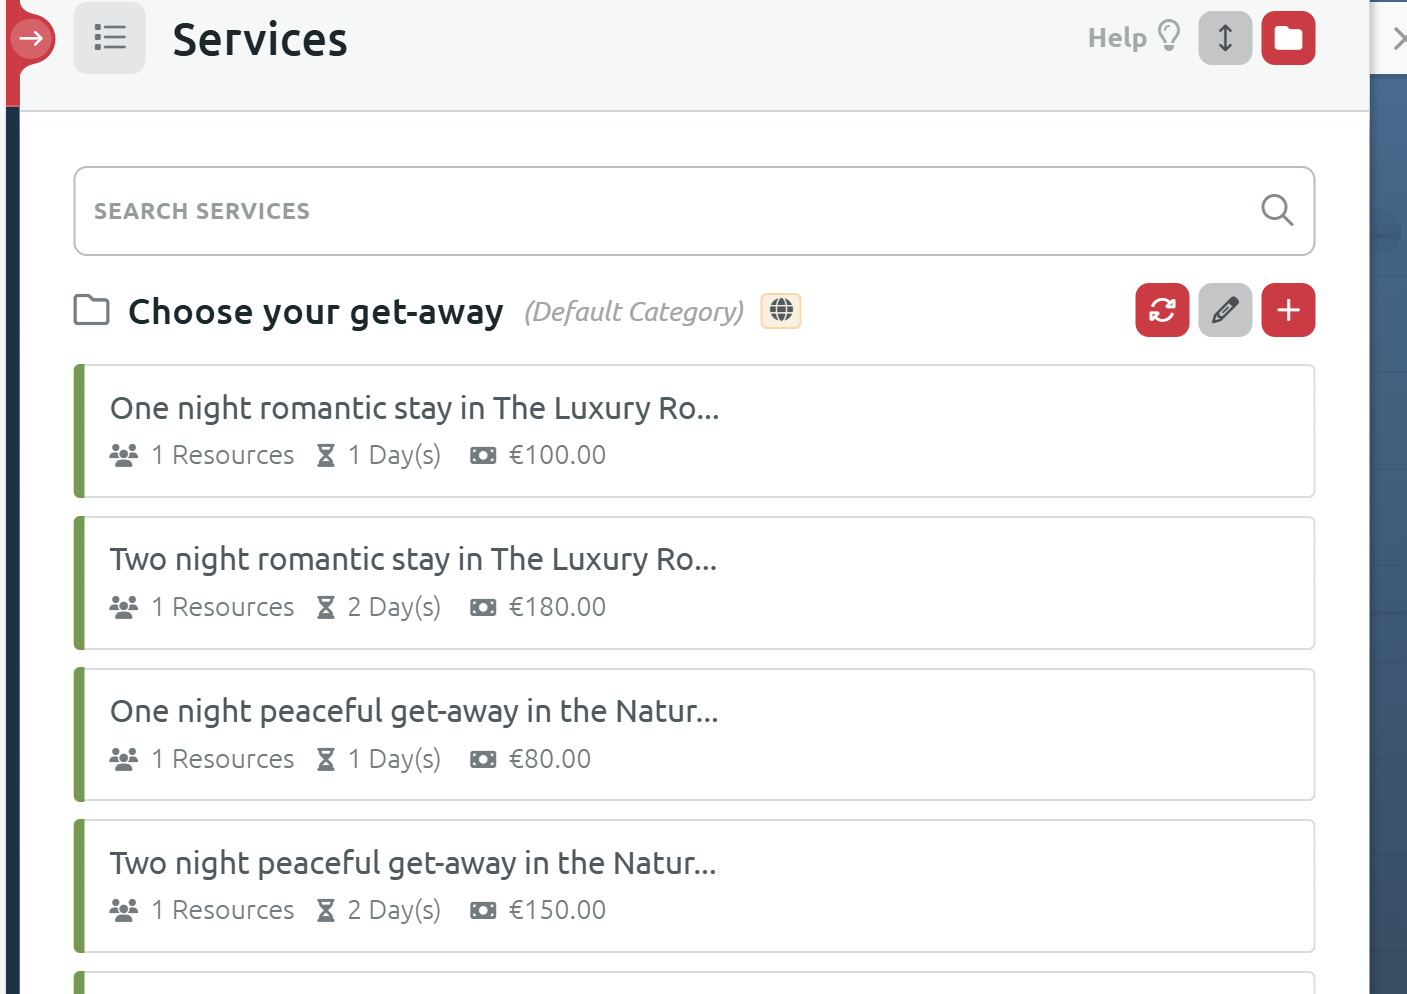
Rename the Service category to “Choose your get-away”
- Navigate to Management > Services.
- Click the grey pencil icon to rename the Service Category
- Type out a name, for example 'Choose your get-away'. The category name will be displayed above the services in the widget, so make it descriptive.
Service 1: One night stay in The Luxury Room
- Navigate to Management > Services.
- Click the + icon to add a new service and call it 'One night stay in The Luxury Room'.
- Next to the service name, change the colour label so that each service has a separate colour. This will make it easier to distinguish the different stays in the calendar later.
- Add a description
- Set the duration of the service to 1 day.
- Make sure only the Luxury Room is available as a resource.
Service 2: Two night romantic stay in the Luxury Room
- Navigate to Management > Services.
- Click the + icon to add a new service and call it 'Two night romantic stay in The Luxury Room'.
- Next to the service name, change the colour label.
- Add a description
- Set the duration of the service to 2 days.
- Make sure only the Luxury Room is set as a resource.
Service 3: One night peaceful get-away in the Nature Room
- Navigate to Management > Services.
- Click the + icon to add a new service and call it 'One night peaceful get-away in the Nature Room '.
- Next to the service name, change the colour label.
- Add a description
- Set the duration of the service to 1 day.
- Set the Nature Room as the resource.
Service 4: Two night peaceful get-away in the Nature Room
- Navigate to Management > Services.
- Click the + icon to add a new service and call it 'Two night peaceful get-away in the Nature Room '.
- Next to the service name, change the colour label.
- Add a description
- Set the duration of the service to 2 days.
- Set the Nature Room as the resource.
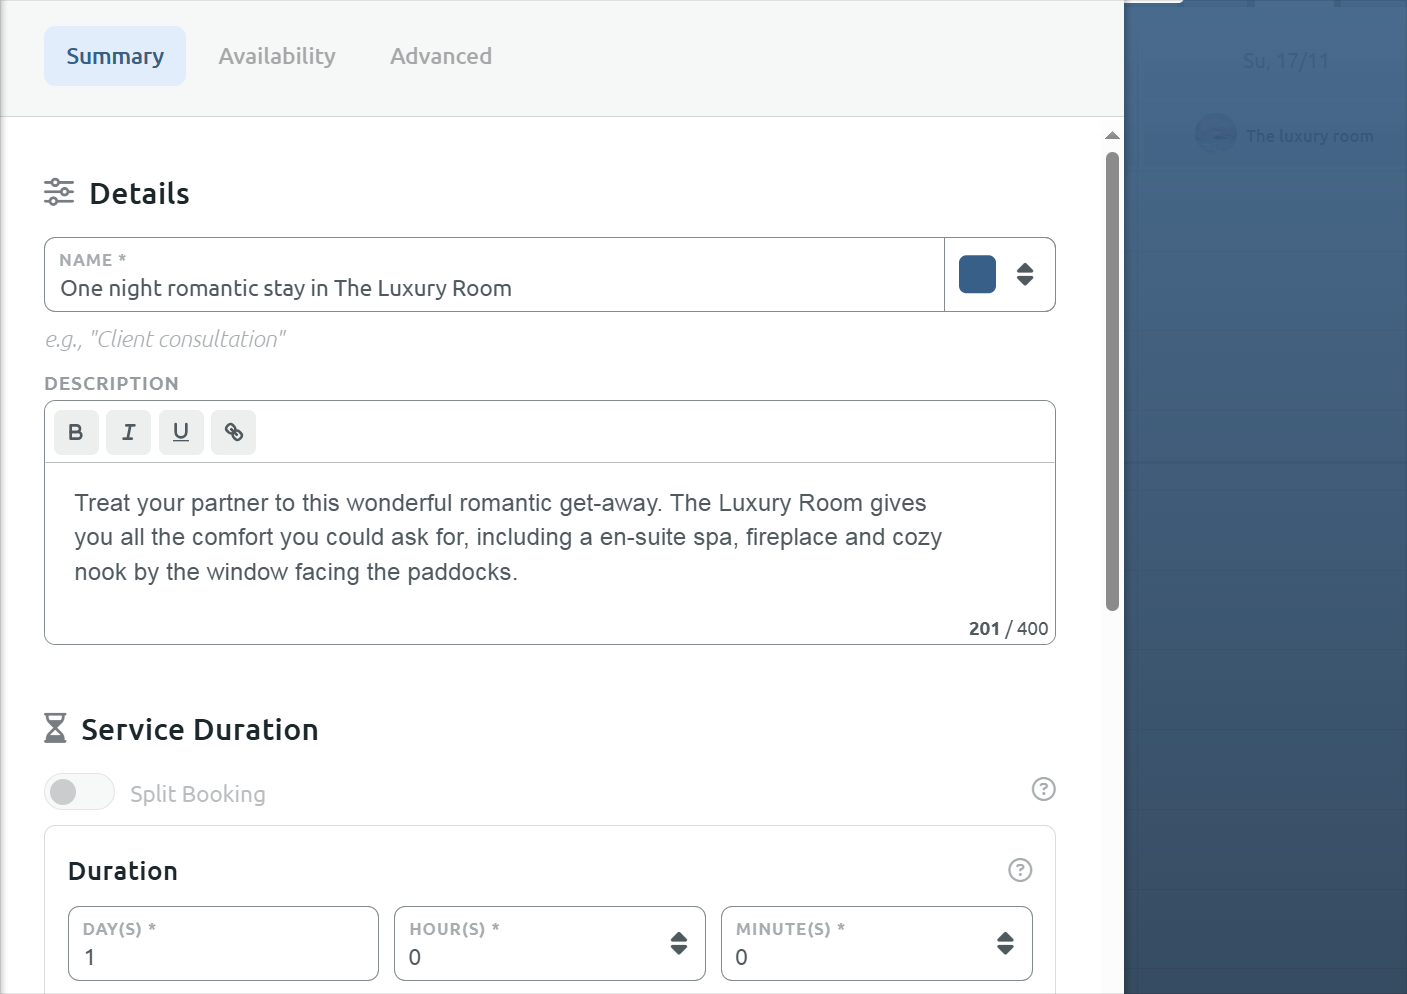
Keep adding as many variations as needed, for example 2-night get-away in the Nature Room, with breakfast or five-night luxury farm stay for two.
Hide the duration of service and change the booking slot display
Just like in the previous example, we are going to hide the duration of service in the Timify widget, as it displays in minutes. A duration labeled "1500 minutes" for a stay could appear confusing or off-putting to customers.
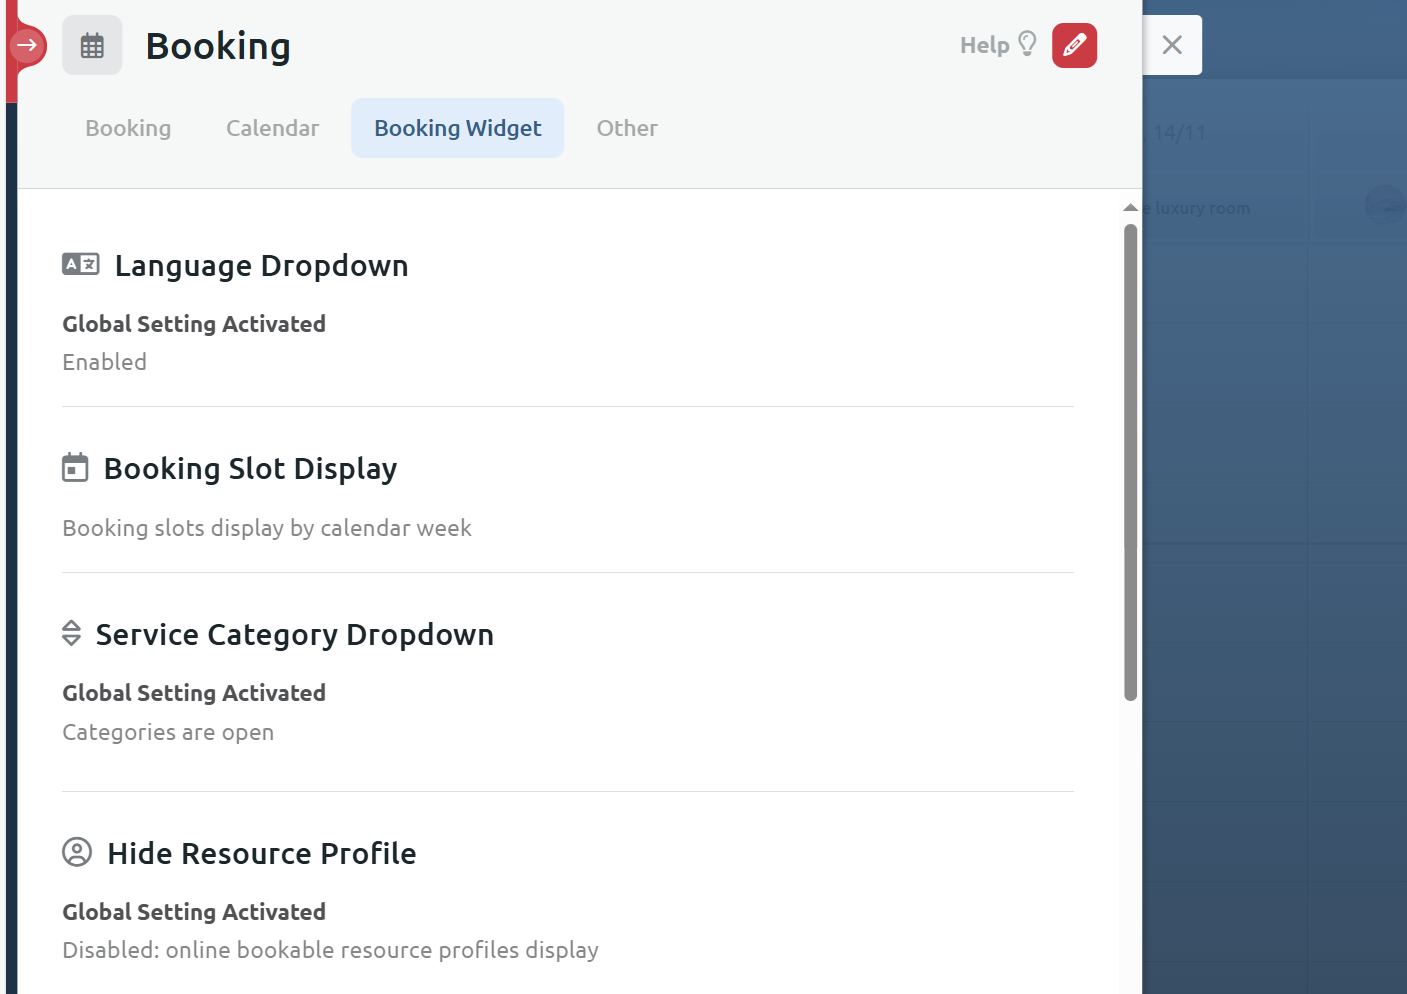
We are also going to change the Booking Slot Display to display by calendar week. We can do both under Settings > Booking > Booking widget.
The booking experience
Let's look at the booking experience for this method.
Choose the package. For example: One night stay in the Luxury Room.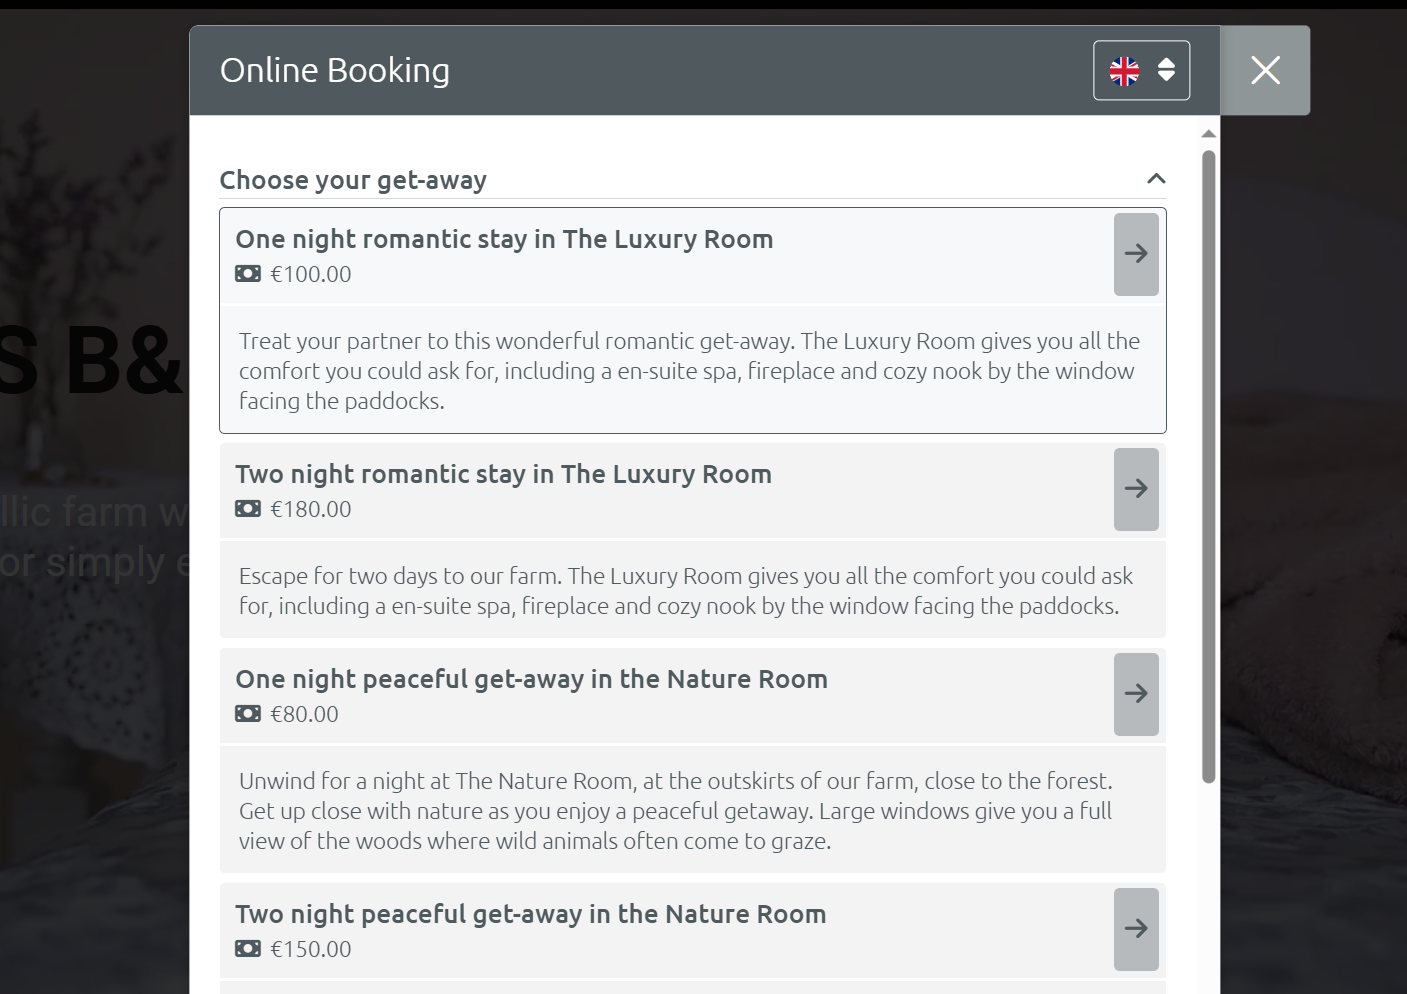
Choose check-in date: Choose what day we would like to check-in. Only the Luxury Room appears as an option, because it is the only resource we attached to this booking. 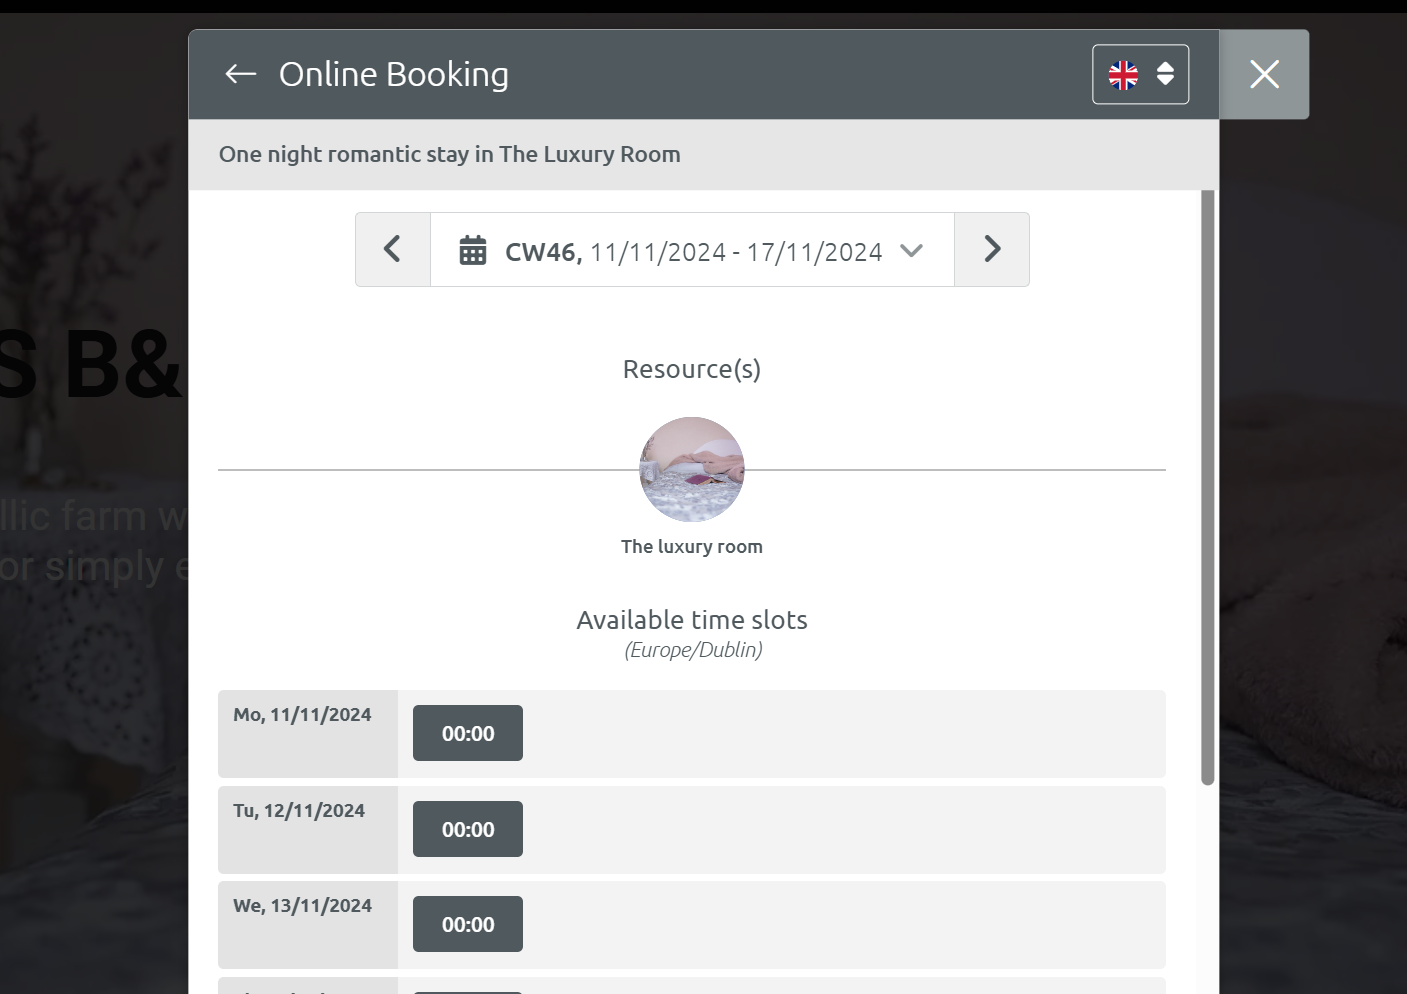
Add your information and finalise the booking flow. You will then receive an automated confirmation email.
Just like the previous example, you book per day and not per night.
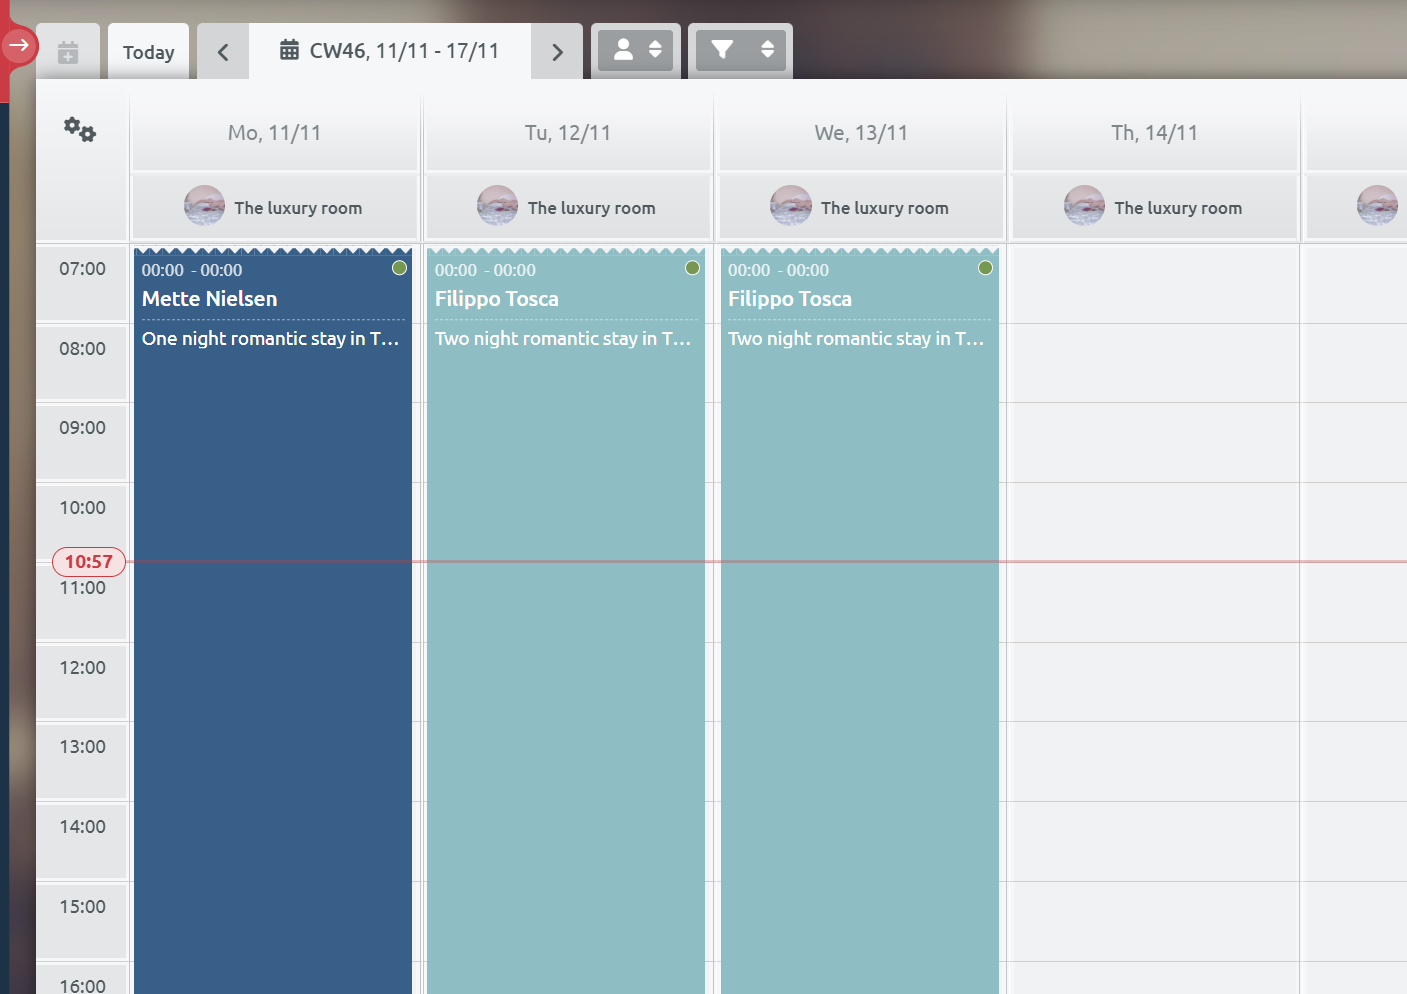
Let's imagine a customer booked the one night luxury stay on Monday 11th of November. This means they check in on Monday 11th of November and checks out Tuesday 12th of November.
As we can see below, a second customer has booked a stay right afterwards. They check in on the 12th of November and checks out on the 14th of November.
Method 3: Room as resource, stay package as a group service
- Each room is a resource
- Stay type is a group service
This method is suitable for hotels with price variations for each room, who prefer offering packages instead of individual bookings.
By adding packages as group services, you can define a specific time for them in your calendar. A group service could for example be a weekend stay from Friday at 3pm to Sunday at 11am.
Group services also allow the option to set a booking limit, so that more people can book the same room. This is useful for hostels with dormitories.
Please note, group services are a Premium feature.
Setting up the rooms
The rooms are set up the same way as the previous examples. Each room is a resource.

- Navigate to Management > Resources to set up each resource (room).
- Add a thumbnail, so the visitor can see which room they are booking
- Set the availability to 00:00 - 00:00.
- Make sure you choose the first 00:00 at the beginning of the dropdown list and the second 00:00 at the end of the dropdown list, to cover the entire 24 hours.
- Tick the box ‘Activate resource for online booking.'
Setting up the hotel packages
Packages allow flexibility in price between rooms and can also give you the option for more variations such as a stay with breakfast or bike hire. It allows you to define the dates and times of each service, and also gives you the option to let more people book the same room.
Rename the Group service category to “Choose your get-away”
- Navigate to Management > Group services.
- Click the grey pencil icon to rename the Group Service Category
- Type out a name, for example 'Choose your get-away'. The category name will be displayed above the services in the widget, so make it descriptive.
Service 1: Weekend get-away - The Luxury Room
- Navigate to Management > Group services.
- Click the + icon to add a new service and call it 'Weekend get-away - The Luxury Room'.
- Next to the service name, change the colour label.
- Set the duration of the service, for example to 1 day and 20 hours. If you add the service to your calendar from Friday at 3pm, checkout will fall on Sunday at 11am.
Ensure that only the "Luxury Room" is selected as an available resource for this service.
Return to the Timify Calendar (the main calendar view upon login) by closing the current menus.
In the calendar view, open the "Resources" tab at the top and select the "Luxury Room."
On the calendar, click your desired date and time for the group service (e.g., Friday, November 22nd at 3:00 PM).
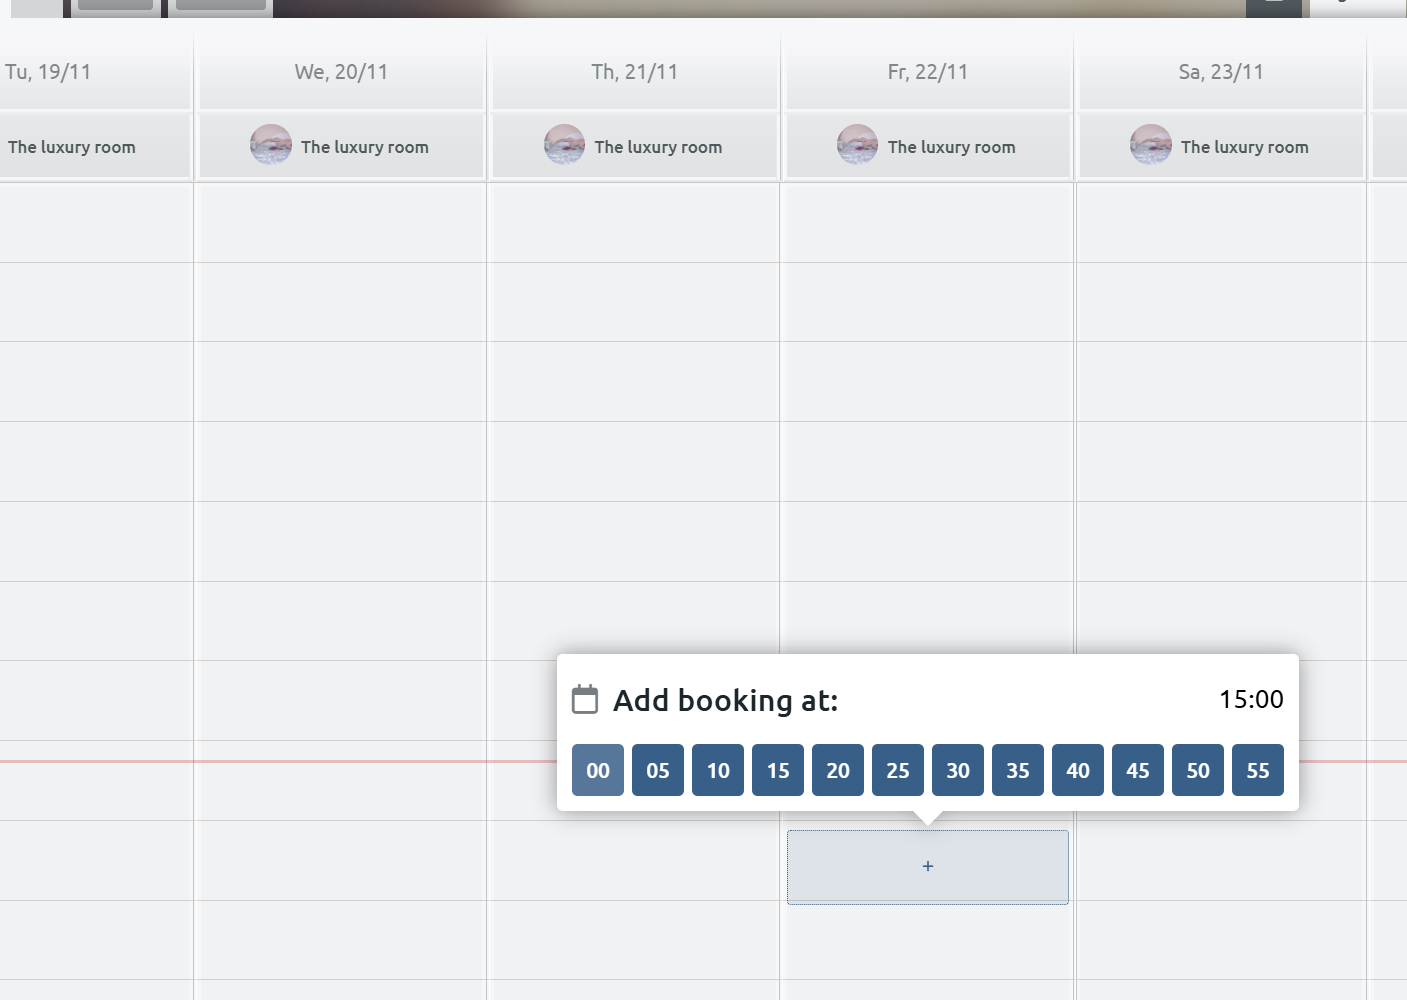
In the pop-up window, go to the "Group Booking" tab.
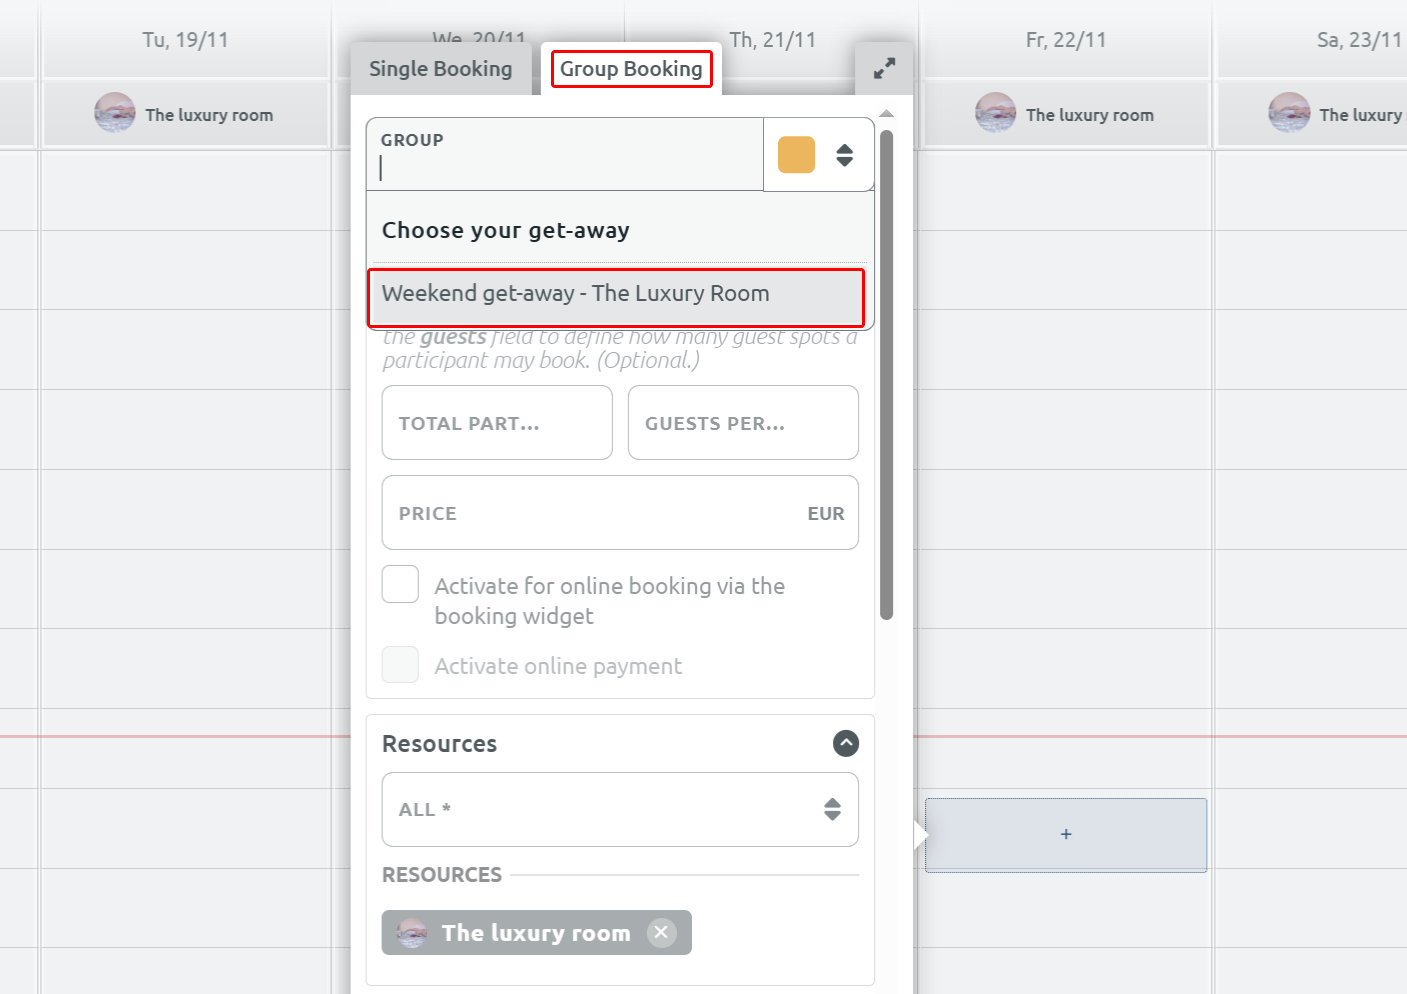
Select the group service you just created from the dropdown.
- If you want the package to be available every weekend, you can add a repeat pattern to it by toggling the repeat switch.
- Click Save.
Now, visitors can only book this weekend getaway at the exact date(s) you have chosen.
Repeat for as many packages as you would like. Make sure to choose different colour labels for each package, so they are easy to tell apart in the calendar.
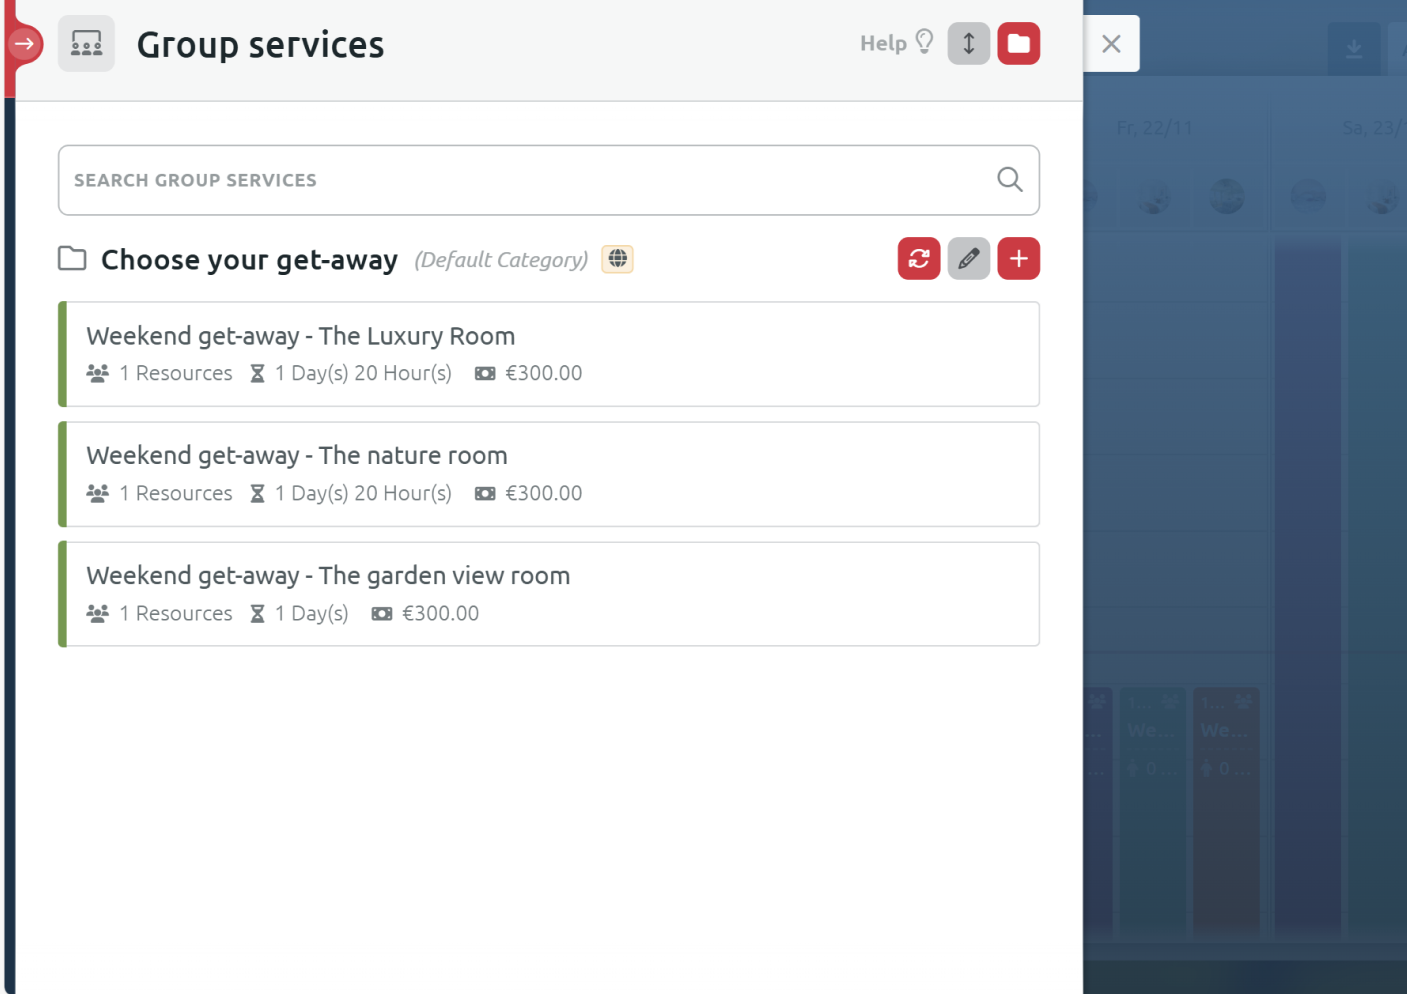
Here for example we have added three group services - a weekend get-away for each of our rooms/resources:
The view from Management > Group Services:
The view from the calendar:
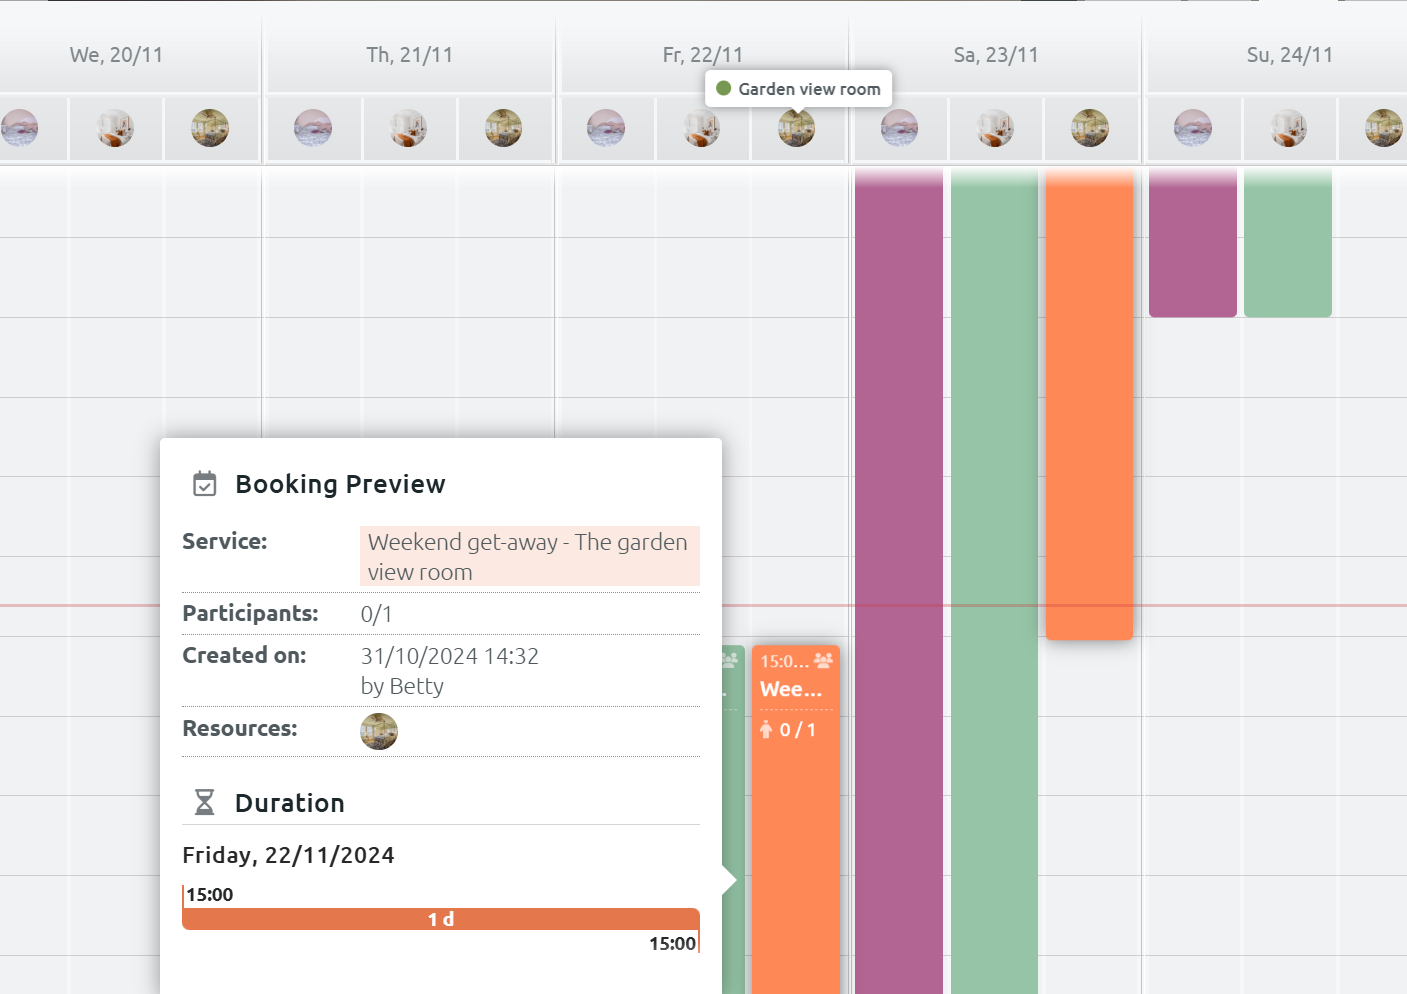
As you can see in the service preview above, there is a section called Participants: 0/1. This means that only one person can book the room, and that none have booked it yet. This will change to 1/1 when someone books it via the booking flow.
The booking flow
When clicking the booking button, the Timify widget appears with the group services we defined.
Let’s choose the first get-away package: Weekend get-away - The Luxury Room.
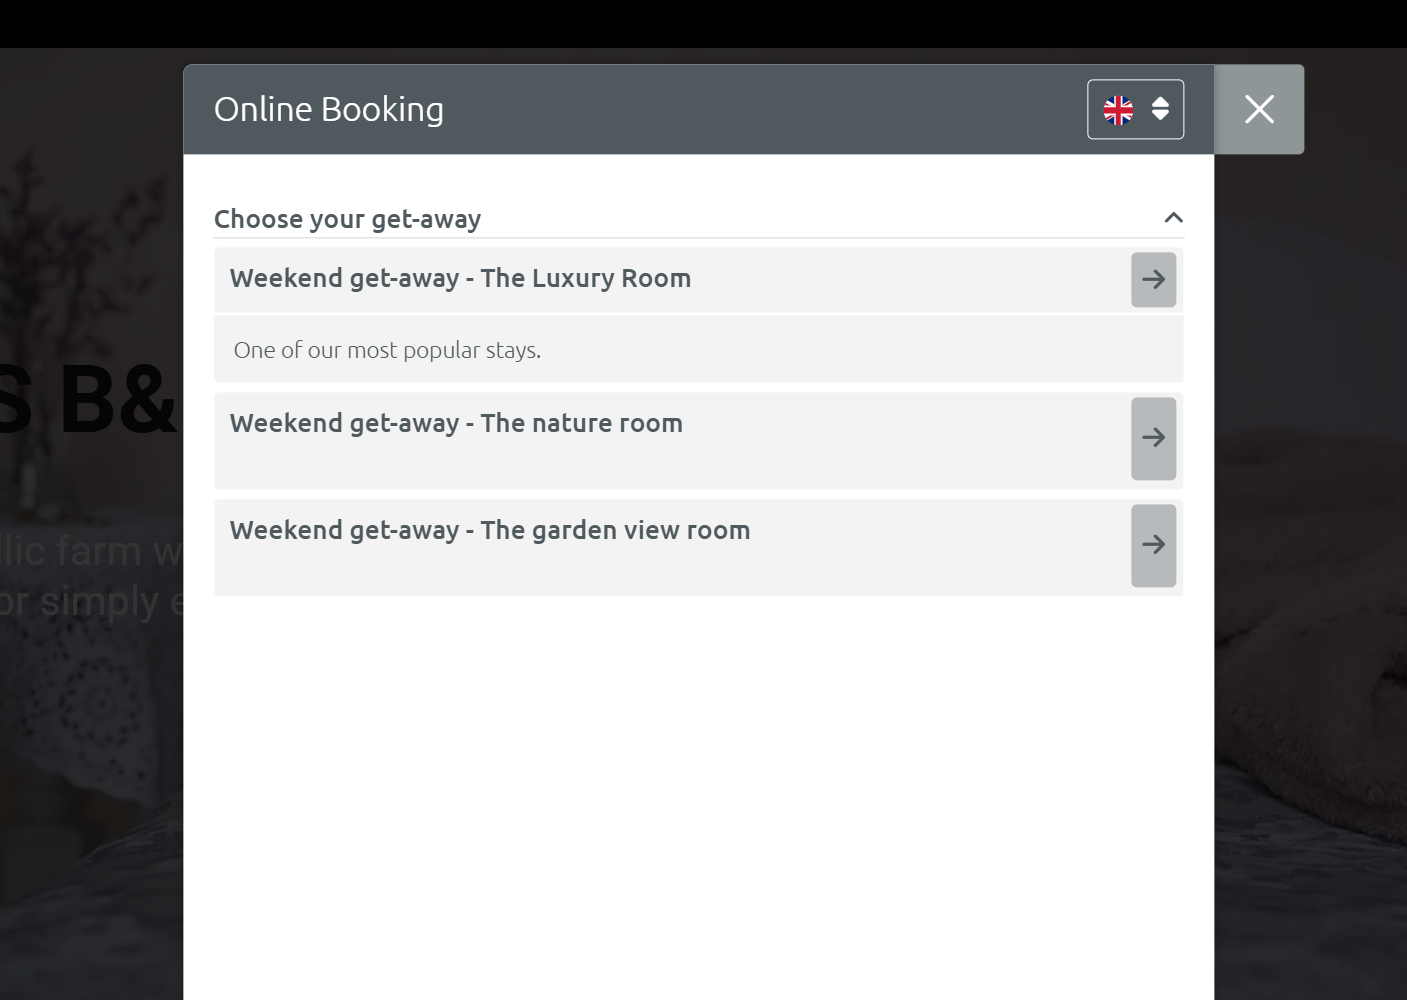
Only the Luxury Room appears as an option, because it is the only resource we attached to this group service. We can also only choose the service at the time it was set.
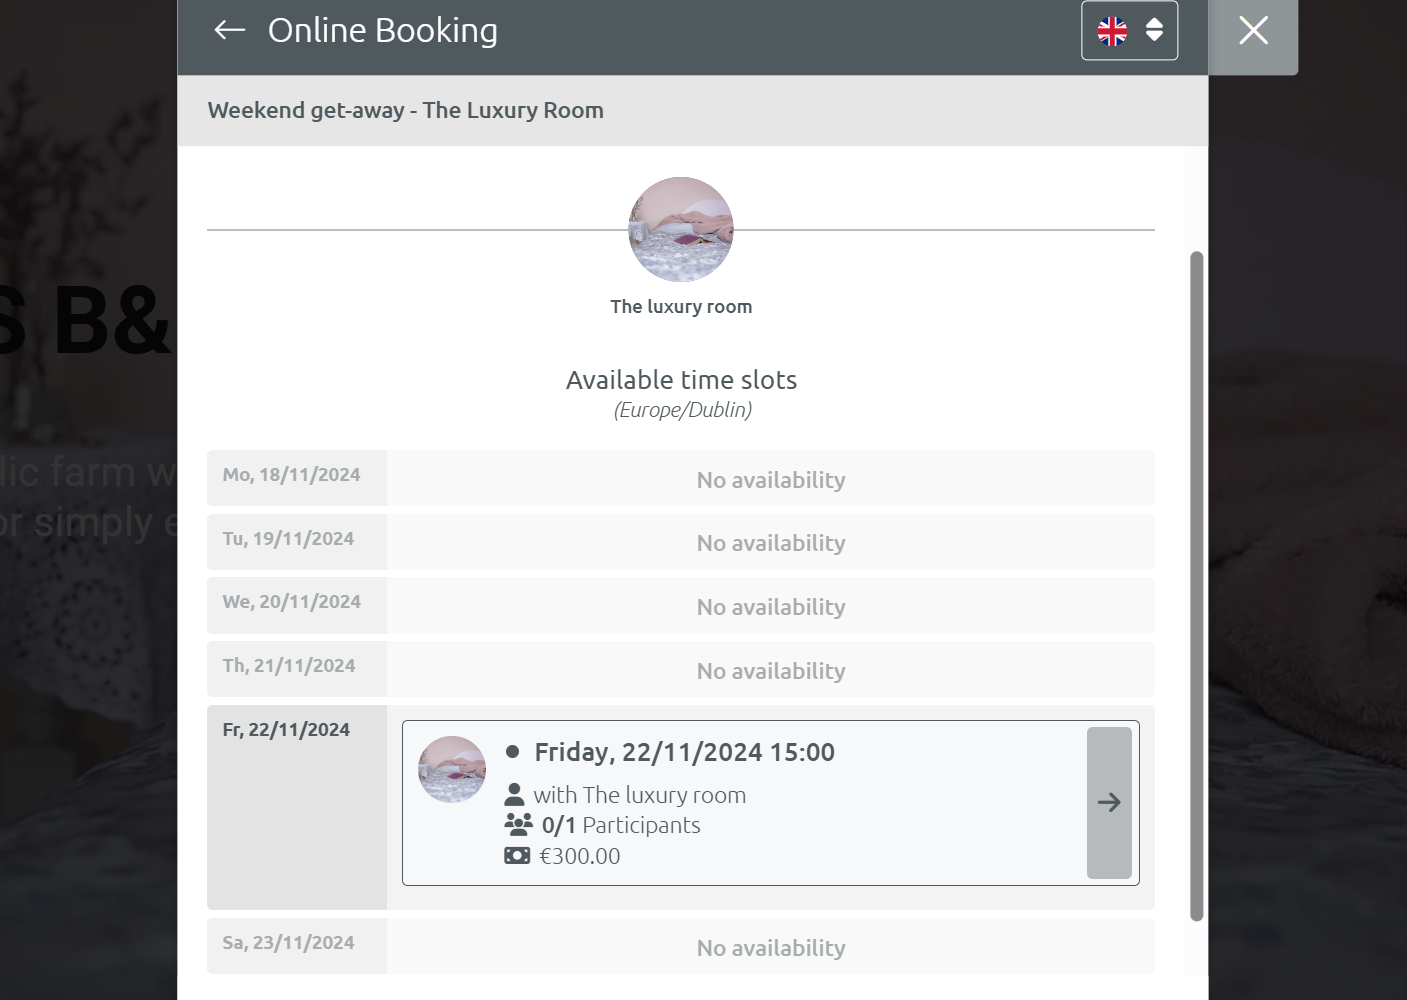
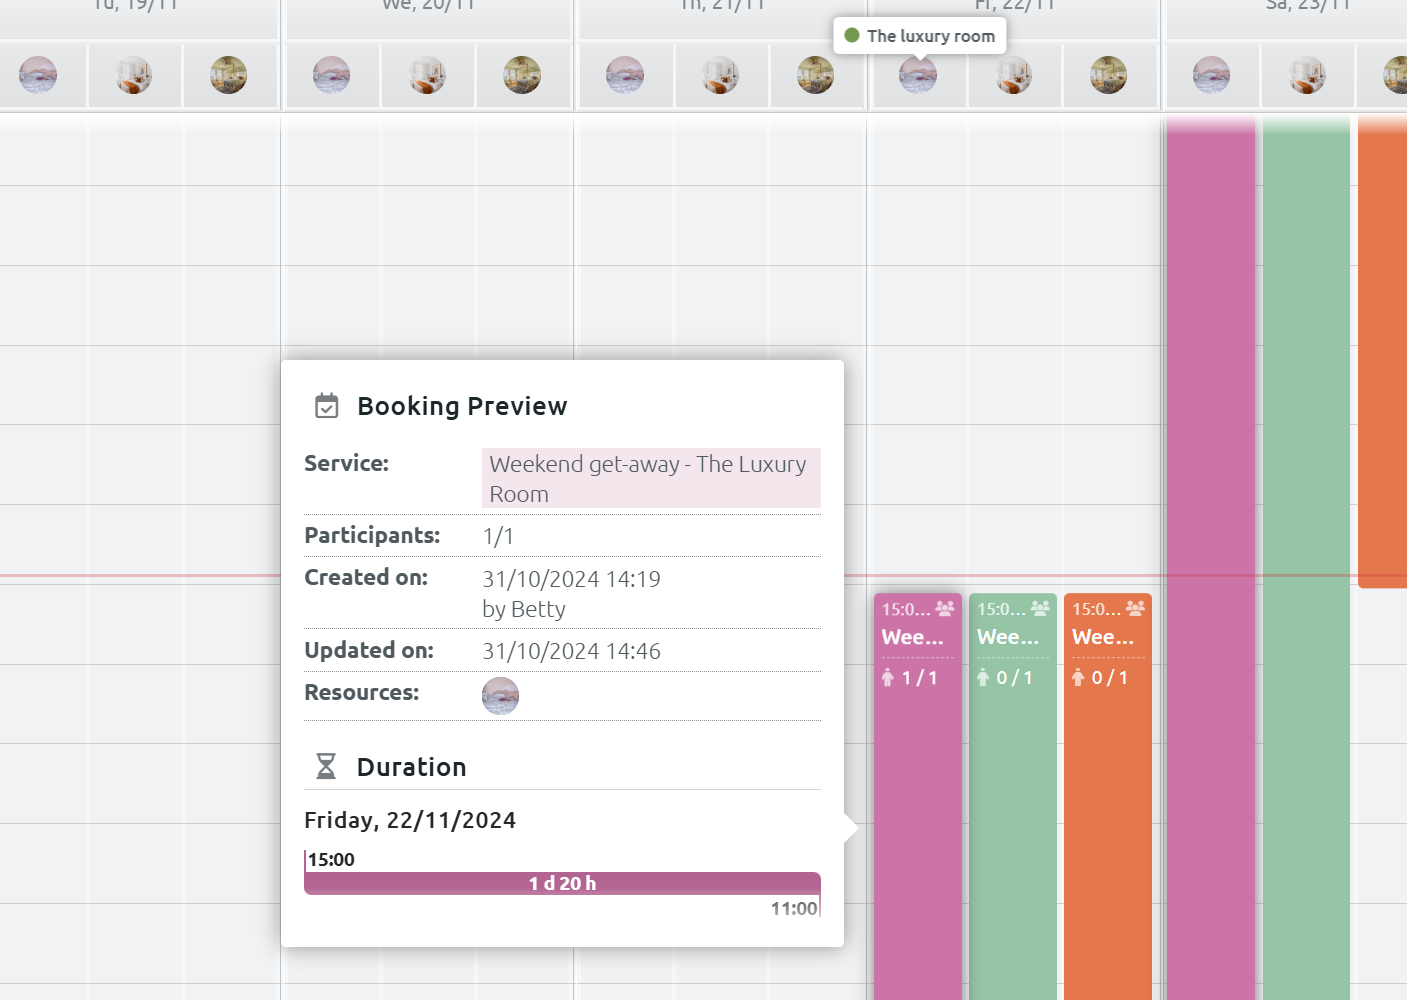
To finalize the process, complete the booking, after which a confirmation email will be sent to you. In the Timify Calendar, you’ll now see that the booking status has updated from “0/1” to “1/1,” indicating the weekend get-away has been successfully booked.
Final thoughts
Although Scheduling+ was designed mainly for the service industry, hotels can also make it work for them using these three methods.
If you are interested in trying out Scheduling+ for yourself, please get in touch with us at info@monosolutions.com or reach out to your Account Manager to get started.
