Mette Nielsen | 29/10/2024
3 use cases for Mono Scheduling+: Health, Beauty, & Fitness
In this article, we explore how different industries might use our new appointment booking tool, Mono Scheduling+
We recently released our new appointment booking solution, Mono Scheduling+. Powered by Timify, Scheduling+ makes it easy for your customers to accept online appointments through their Mono website.
In this article, we dive into three different use cases from three industries, and how they would use Scheduling+.
Through each use case, we also explore each of the three Scheduling+ plans: Classic, Premium - 5 resources and Premium - 10 resources.
Who is this article for?
This article is for website resellers who create websites for SMBs in the service industry, have a Mono reseller account and are considering offering Scheduling+ to their clients. If you don't yet have a Mono account, you can sign up for a free trial here.
How to choose a Scheduling+ plan
Which Scheduling+ plan you should choose depends on the needs of your SMB clients.
The plans are built on each other, so if you upgrade you will never lose out on any features. That is, all features in Classic will also be available in Premium.
The Classic Plan:
The Classic Plan is ideal for small businesses with basic scheduling needs. It offers an affordable solution for managing bookings efficiently.
Some key features of the Classic Plan include:
- Unlimited appointments
- Rescheduling and cancellations
- Booking confirmation
- Online payments.
- Three resources.
The Premium Plans:
The Premium Plans are ideal for small to medium-sized businesses with more complex needs. The Premium Plans include all the Classic features as well as advanced features such as:
- Shift plan
- Group bookings
- Preparation & follow-up times
- Marketing offers
- Calendar sync.
- Choose between 5 or 10 resources.
These are just the key features of the Scheduling+ plans. Please click here for a full overview.
Scheduling+ for the Health Industry

Doctors, dentists, physiotherapists and other health professionals can benefit from a way to accept online bookings for their clinic.
Let's look at an example of how a dentist might use Mono Scheduling+.
Use case: Dentist
Let’s imagine your client is a dentist. They are located in the city, and while they have some return customers, they have high churn and rely on continuously finding new customers. They have a separate tool for managing shifts and employees, so all they need is for customers to more easily book online.
Key information about the business:
- Number of dentists: 3
- Booking methods: They only take phone calls and emails
- Booking management: Appointments are managed by the dentists
Which plan should you offer?
The Classic Plan is sufficient for the dentist’s needs.
The practice has three employees and requires basic functionality such as unlimited appointments, a shared Timify calendar, and confirmation emails.
While they may consider advanced features in the future, for now, a simple booking solution will help attract more new customers and improve efficiency.
Let’s set up Scheduling+ for the dentist
The dentist opted for Scheduling+ Classic – 3 Resources.
After you, as their provider, have guided them through the subscription set-up as described in our onboarding guide, the dentist is now ready to start setting up their appointments.
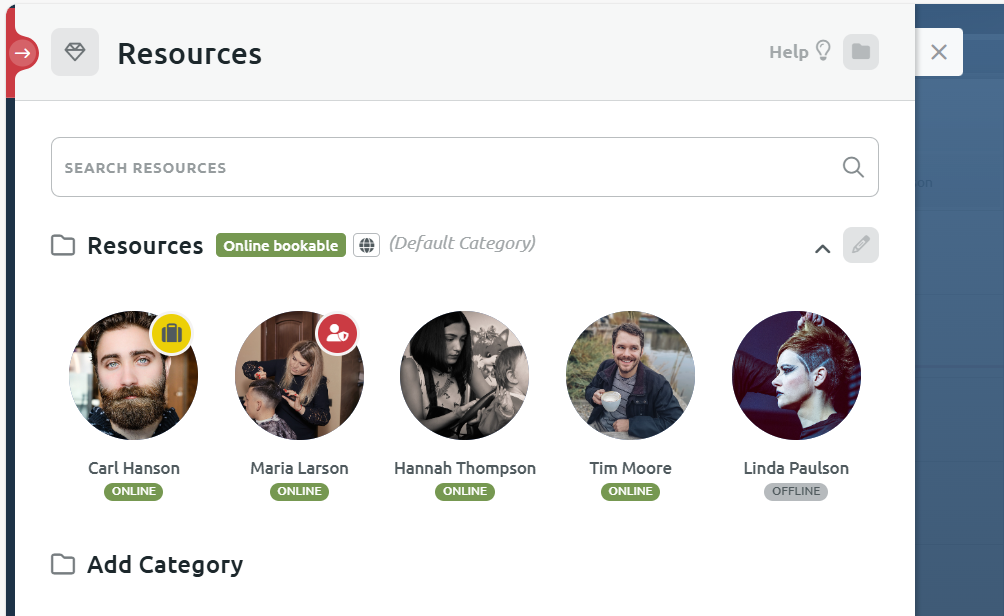
Setting up resources: Who is needed for the appointment?
- Resources are items or people needed for the appointment.
- In this case, each dentist would be a resource.
- Navigate to Management > Resources to set up each dentist/resource, their availability and information.
- You can also invite each dentist to become a user of the Timify App. That way, they can manage their own appointments from the shared Timify calendar.
- The number of resources available in the app corresponds to the plan you have chosen. So, for the Classic plan, you will be able to see 3 resources.
Services: What services can visitors book?
- A service is the event or appointment that the visitor can book.
- In this case, a service could be a dentist check-up, for example.
- Scheduling+ comes with an unlimited number of services, regardless of the plan.
- From the Timify App, navigate to Management > Services.
- Click the + icon to add a new service, for example a check-up, x-ray, or cleaning.
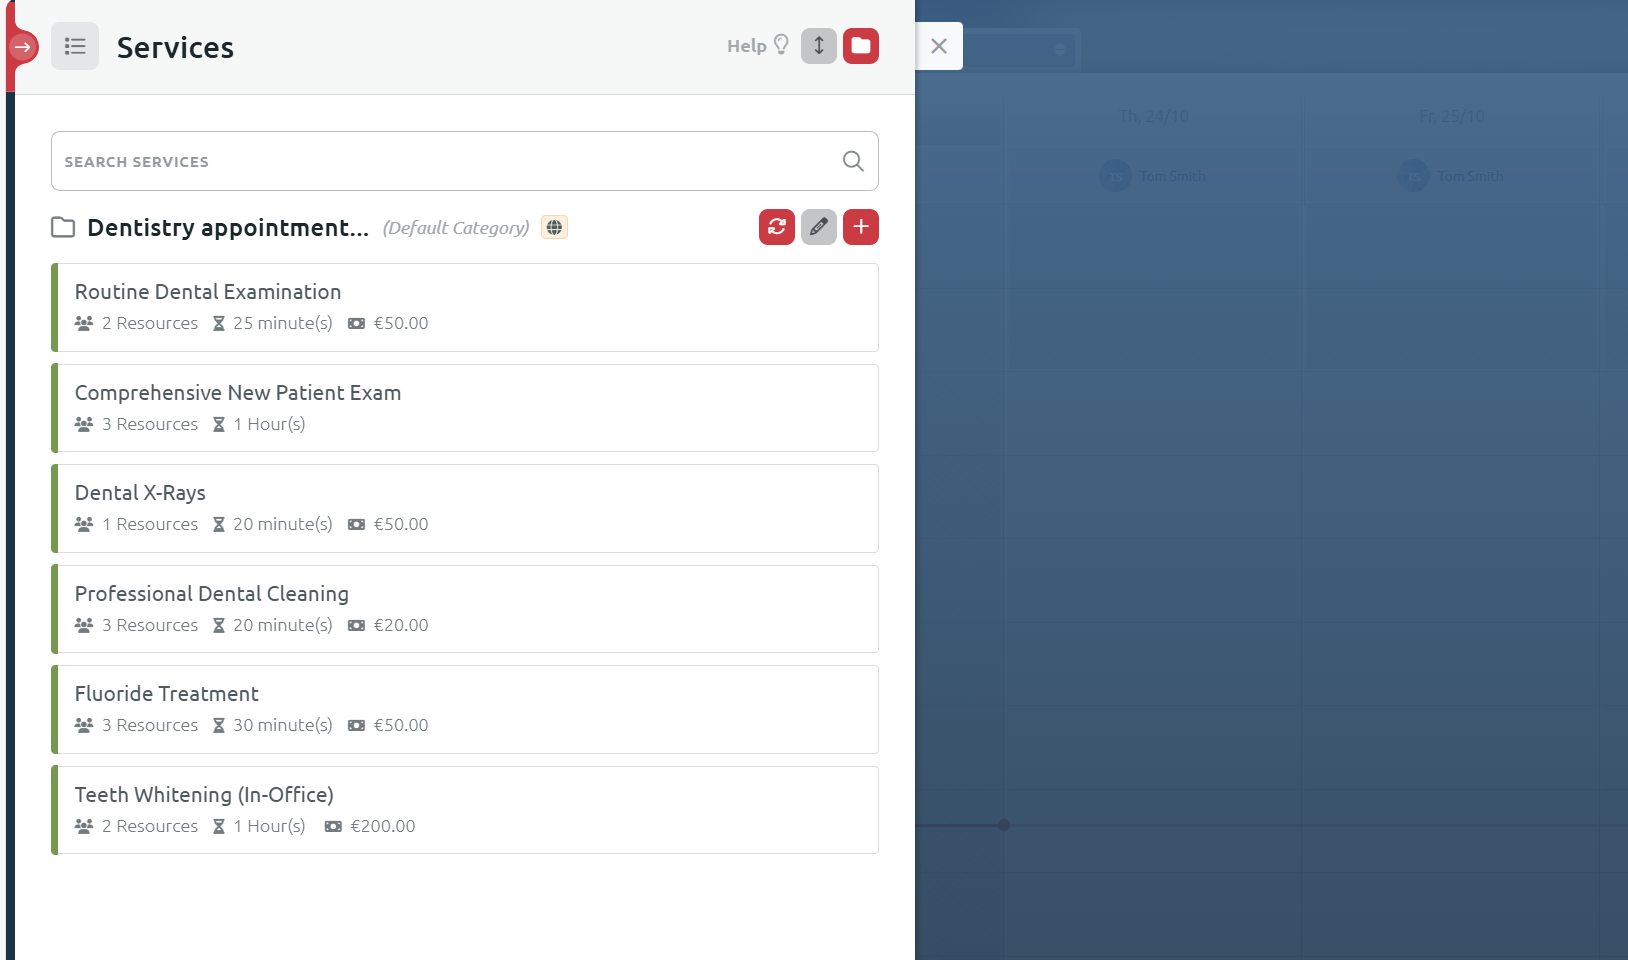
Choose which resources should be available for each service. In this case all dentists are available for all services.
Booking an appointment
Let's look at the booking experience itself.
What does it look like when a site visitor books an appointment with this dentist online?
First, the visitor clicks the 'Book now' button and a pop-up appears with a list of the services.
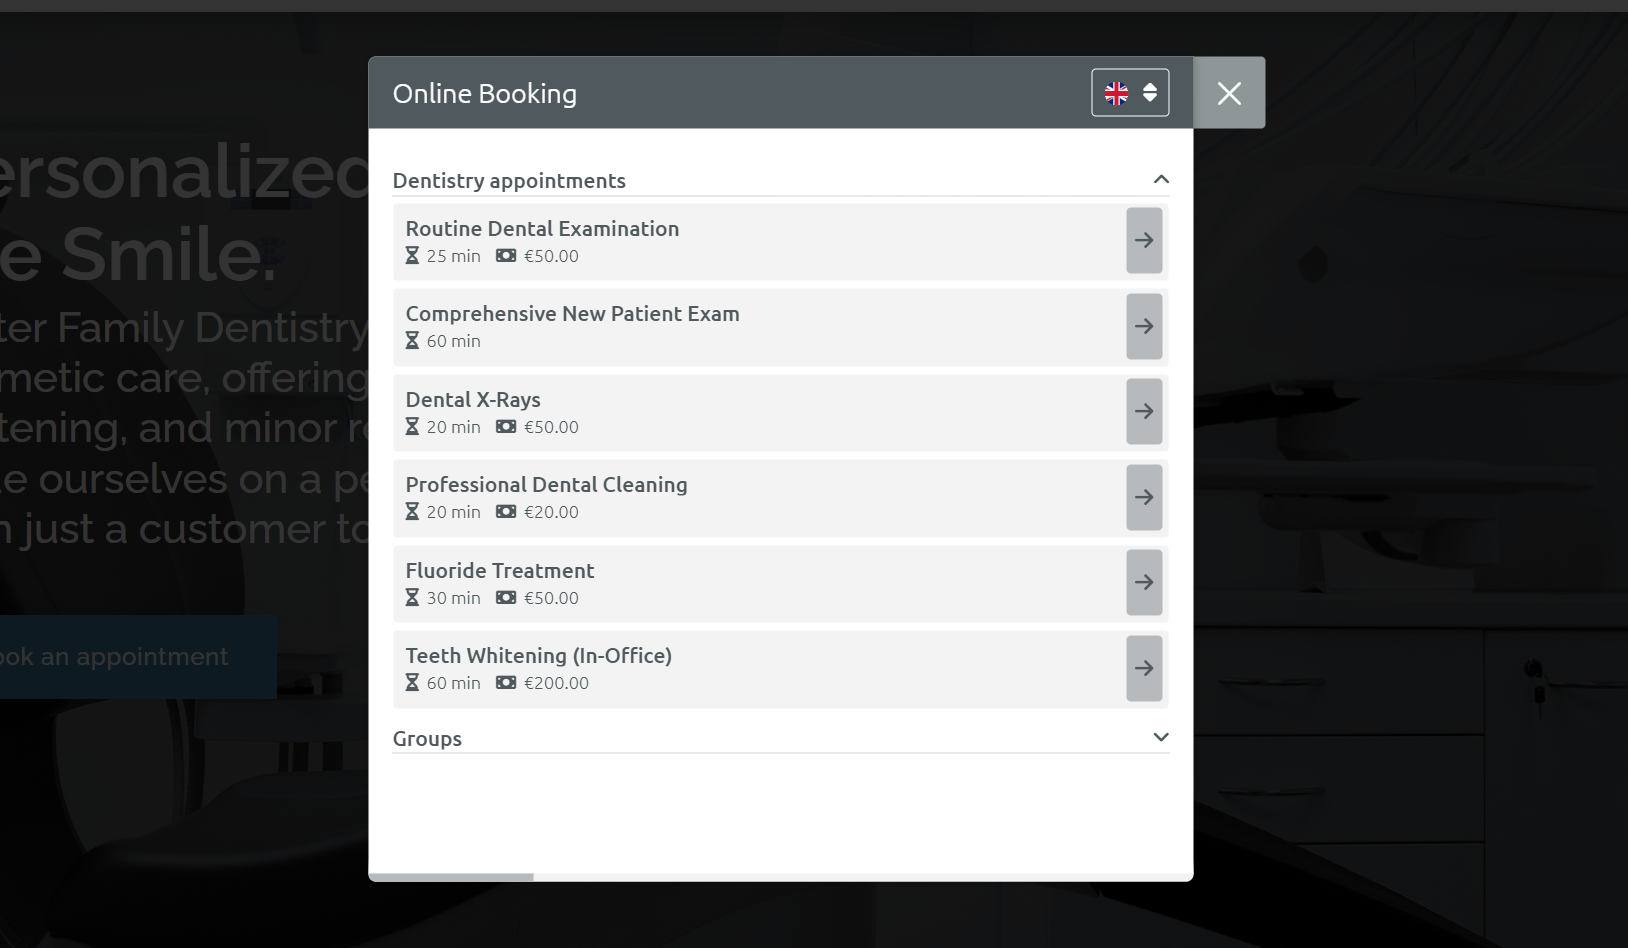 After choosing a specific appointment, they can choose the dentist (resource) and the time. Then, they can enter their details and finalise the appointment.
Scheduling+ for the Beauty Industry

Next, let's explore how Scheduling+ can be used in the beauty industry.
Many of our partners serve small and medium-sized businesses (SMBs) within this sector, including hair salons, nail salons, massage parlors, and makeup studios.
Use case: Hairdresser
Let’s imagine your client is a hairdresser located in a suburb, centrally next to the local mall and grocery stores. They get a lot of foot traffic and walk-ins. Many in the area know the salon by word of mouth.
Key information about the business:
- Number of hairdressers: 4
- Booking methods: They accept walk-ins and phone bookings only.
- Booking management: Appointments are managed through Google Calendar.
Which plans should you offer this hairdresser?
Let's imagine that you sell them the Premium plan with 5 resources.
They can use 4 of their allocated resources on each hairdresser.
The fifth resource can be reserved for future team growth or used for an assistant or part-timer during busy periods.
The Premium plan also allows them to sync their information with Google Calendar. Additionally, they can manage shifts using the shift planner. By sending reminders, they can reduce no-shows and improve overall efficiency. The system also allows them to add buffer time before and after appointments, giving them time to clean their workstation and check out clients.
Let’s set up Scheduling+ for the salon
After you have guided them through the subscription set-up, and the email verification process as described in our onboarding guide, the salon is now ready to start setting up their appointments.
Setting up resources: Who is needed for the appointment?
- First, the salon needs to define their resources - items or people needed for the appointment.
- In this case, each hairdresser would be a resource.
- Navigate to Management > Resources to set up each resource, their information and availability.
- Here, you can also invite each hairdresser to become a user of the Timify App. That way, they can manage their own bookings and customers.
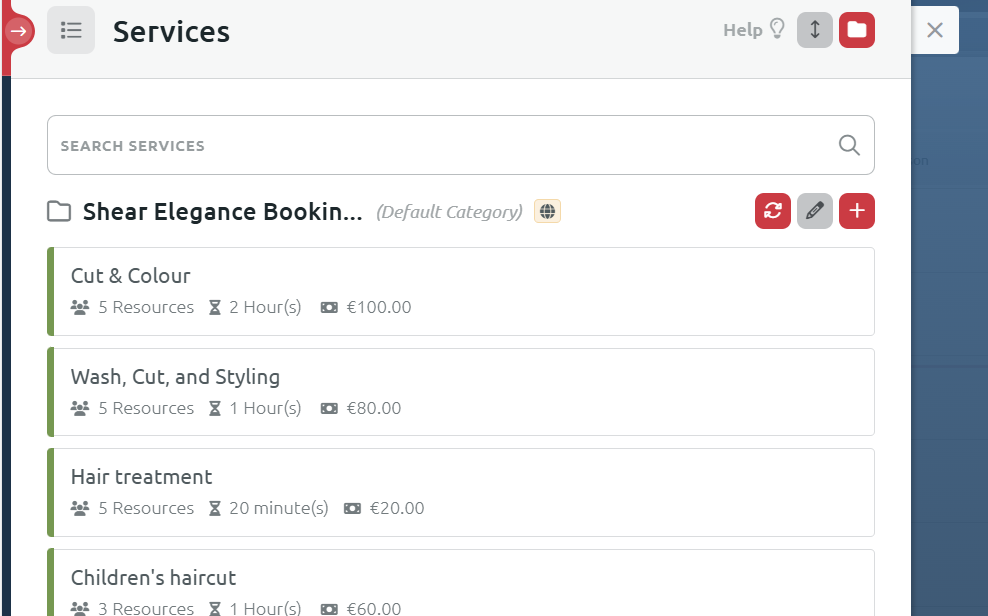
Services: What services can visitors book?
- A service is the event or appointment that the visitor can book.
- In this case, a service could be a haircut or a hair treatment, for example.
- Navigate to Management > Services. Click the + icon to add the services, for example haircut, cut and colour, hair treatment etc.
- You can also select which resources are available for each service. For instance, all hairdressers are available for 'Cut & Colour' services, while only Carl, Maria, and Linda can be booked for 'Children's haircut'.
Setting up email reminders
The salon would like to send automatic reminders to reduce no-shows.
Automatic reminders are already set up on every Mono Premium Timify account as per the global settings (i.e. the settings that are defined globally by Mono for all accounts). The Global settings are set to automatically remind customers one day before their appointment.
However, the salon would like to make their own settings.
- Navigate to Settings > System Notifications
- Click the red edit icon in the top right corner.
- Scroll down to Booking reminders and untoggle the Use Global Setting button.
- Define your own reminders for both visitors and resources.
The salon would like a reminder to both customer and hairdresser an hour before the appointment.
Setting up calendar sync
The Salon also wants to sync the appointments to their personal calendars to never miss an appointment.
- Go to Apps > App Marketplace and install Google Calendar.
- This can only be done by an admin.
- You will then be prompted to invite your chosen resources to sync their calendars.
- Once you click the Invite button, the resource will receive an email to their Google inbox to complete the process.
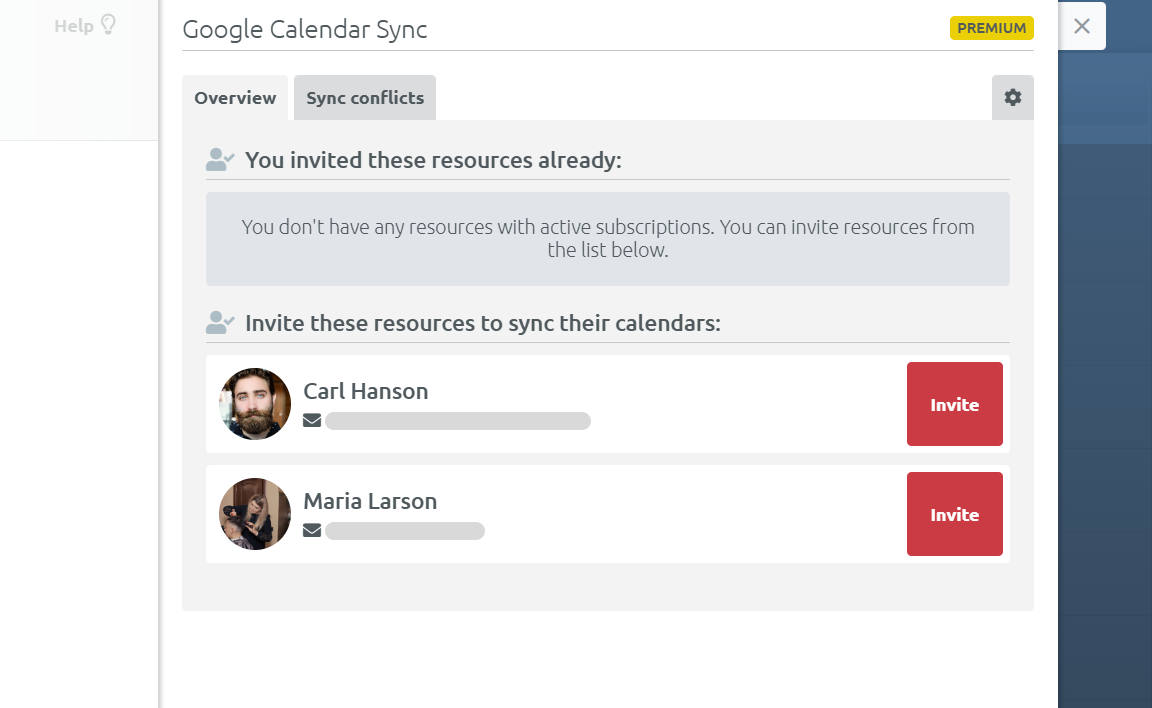
- The resource clicks the link in the email, follows the set-up process. The calendar is now synced.
For more information about calendar synchronization, please visit this Timify article.
Setting up the shift plan
The shift plan makes it easy to manage which hairdressers are working on a particular day.
Sick days and holidays can be logged here, and automatically blocks the resource in the online booking flow.
- Access the Shift Plan from the top right tab in the Timify App.
- First, choose which resources should be visible in the shift plan via the Resources tab at the top.
- In the shift planner, you can define when a specific resource is working.
- Only available resources can be booked during the booking flow.
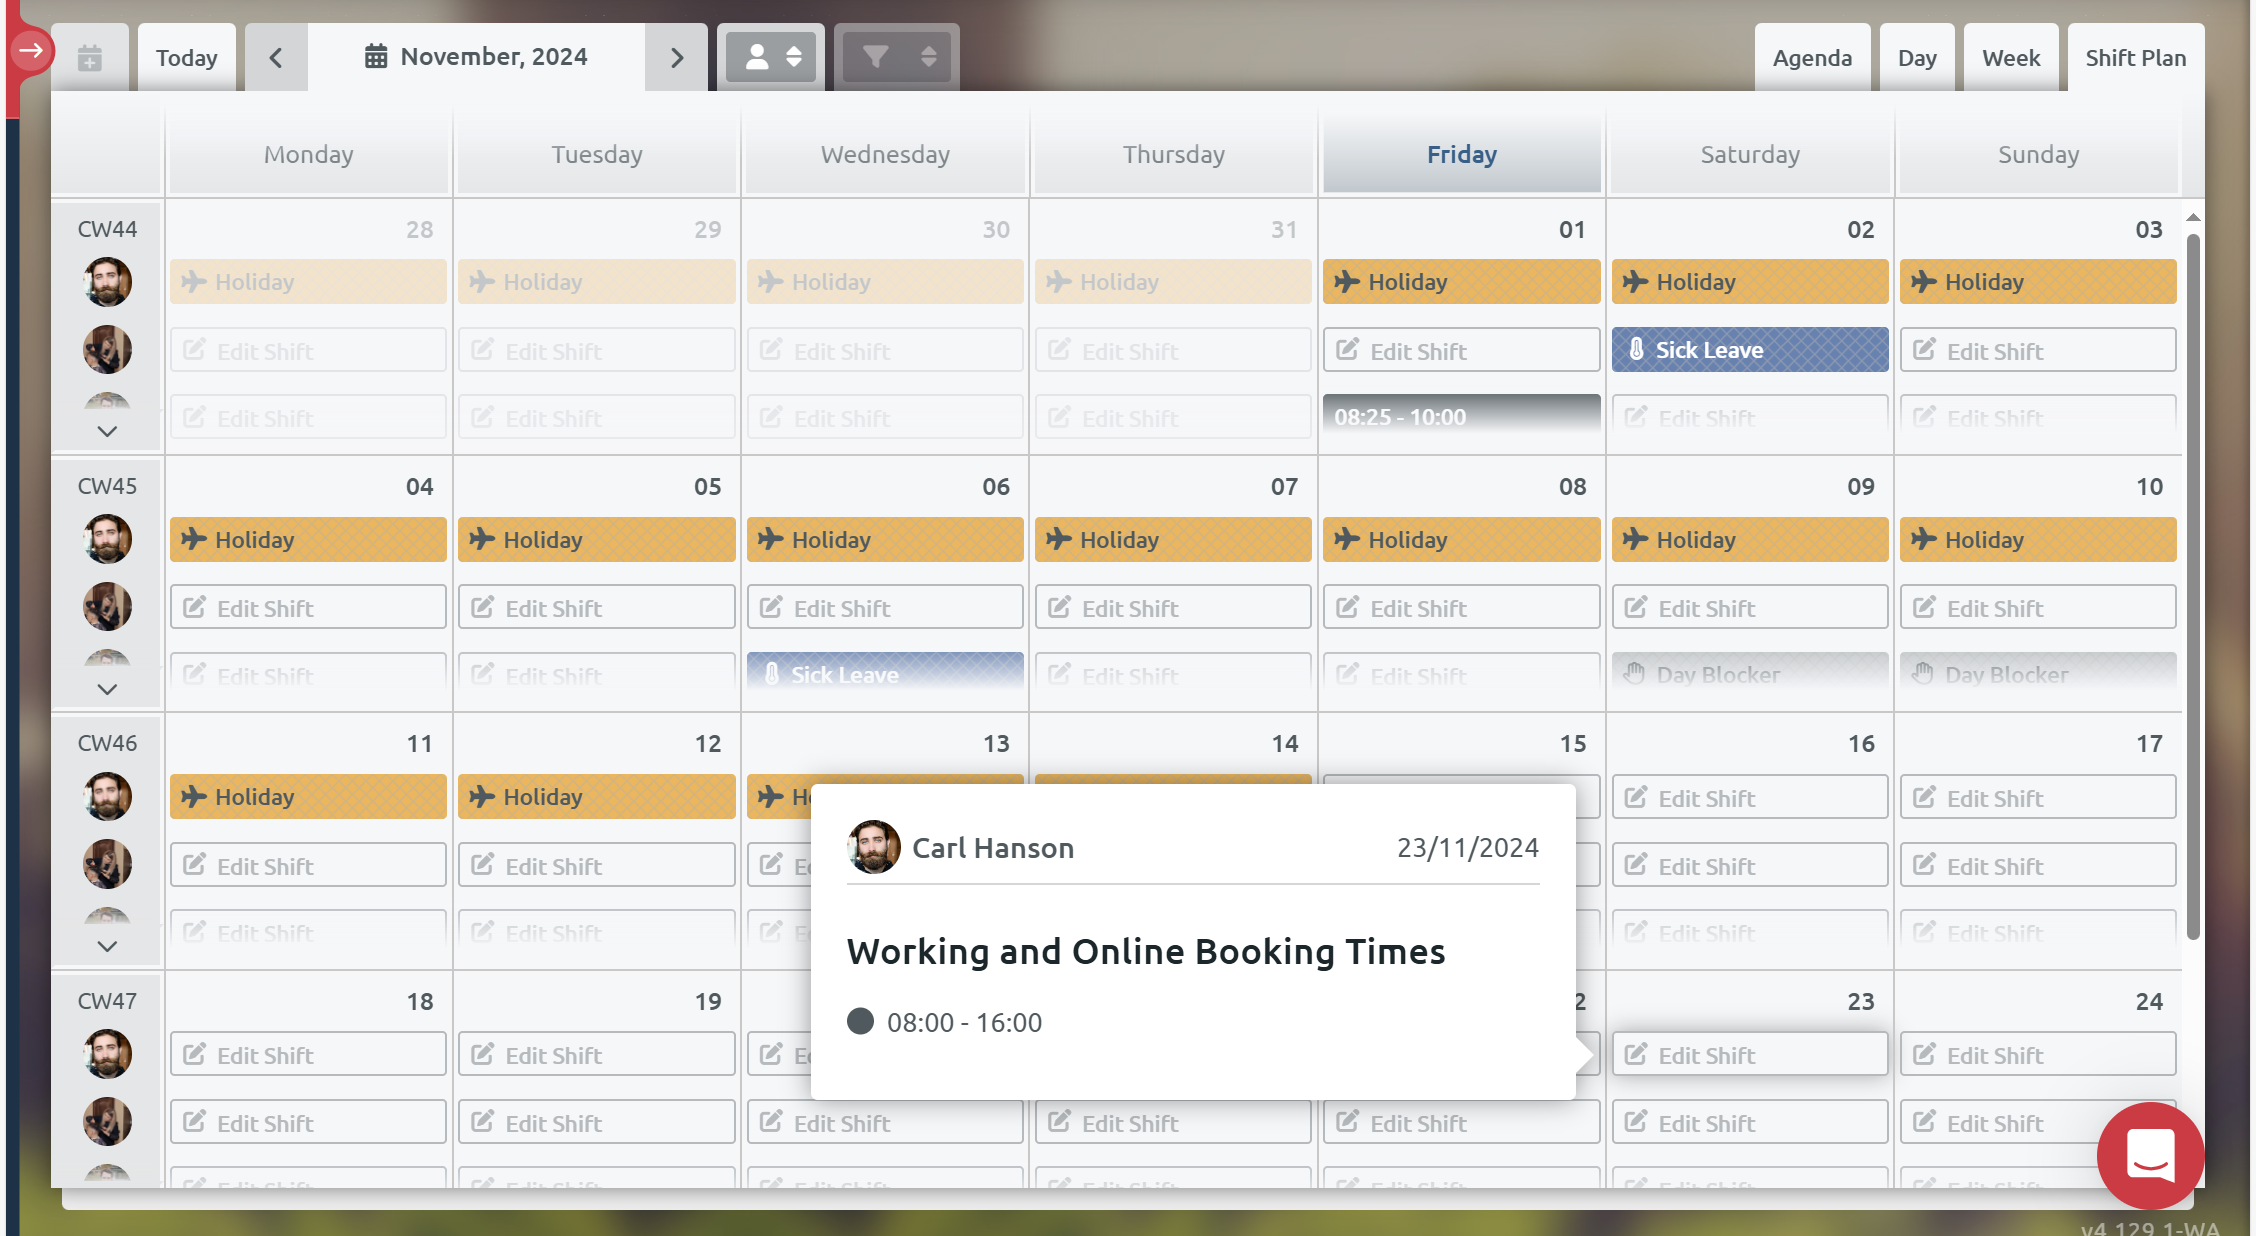
Read more about the Shift Planner here.
Booking an appointment
Let's look at the booking experience itself.
What does it look like when a site visitor books an appointment with this hairdresser online?
First, the visitor clicks the button and a pop-up appears with a list of the services.
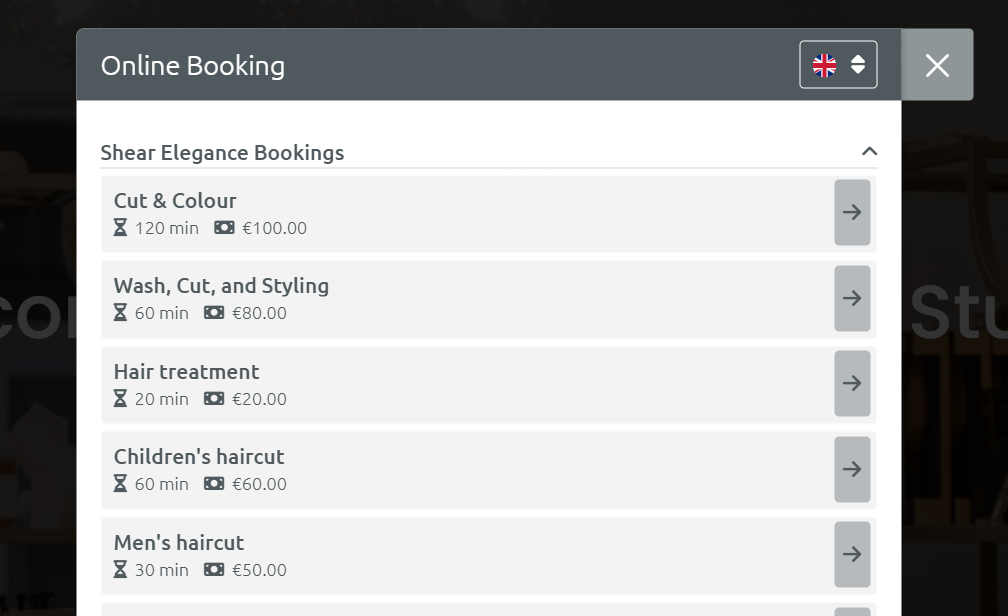
After picking a service - let's choose Cut & Colour - we can now choose either a time or we can also choose from any of the available resources (hairdressers).
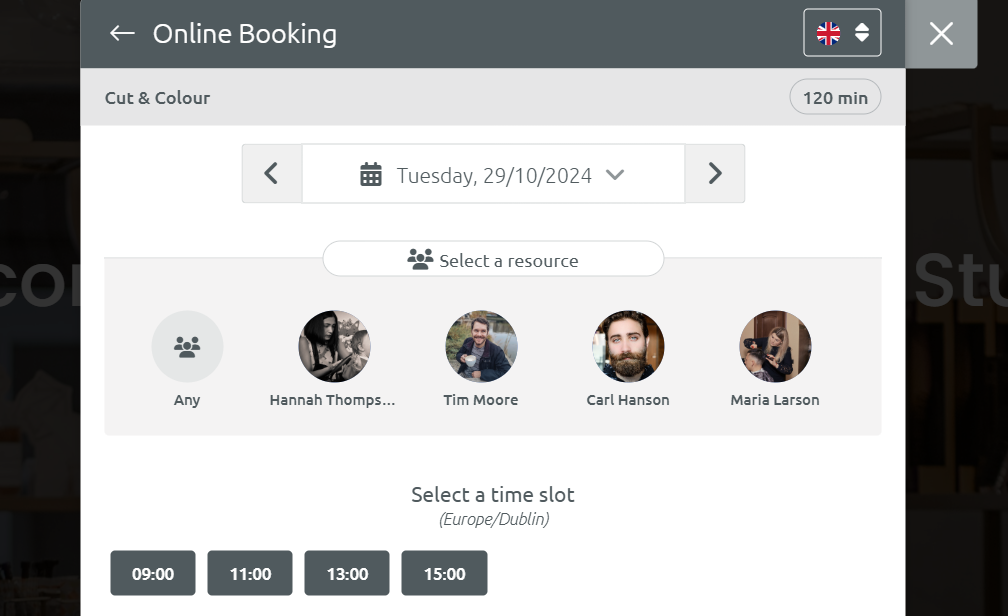
If we choose a time, we book with any resource available. If we prefer a specific hairdresser, we can pick that first, and then choose a time, when they are available.
Scheduling+ for the Fitness Industry
Fitness centres, gyms and sport venues need flexibility to handle many members. They need ways to book multiple people to the same events and manage the time of their personal trainers and instructors.
Use case: Fitness studio
Let’s imagine your client is a fitness studio. They are a boutique gym located in the center of a city. They currently manage registrations through a contact form. This works, however, is not the most efficient way for this fitness studio to manage their classes, as it is quite manual. They are planning to grow their team soon.
Key information about the business:
- Number of instructors: 6
- Booking methods: Each class is booked via a contact form
- Booking management: Appointments are managed manually by the instructors.
Which plans should you offer this gym?
Premium – 10 resources would be the ideal option, as it allows for group bookings, and it also makes it possible for the studio to rent out a fitness room during quiet periods. The room can then be registered as an extra resource.
Let’s set up Scheduling+ for Power Training
The studio opted for Scheduling+ Premium – 10 Resources.
After you have guided them through the subscription set-up as described in our onboarding guide, the studio is now ready to start setting up their appointments.
Setting up resources: Who or what is needed for the appointment?
- Resources are items or people needed for the appointment.
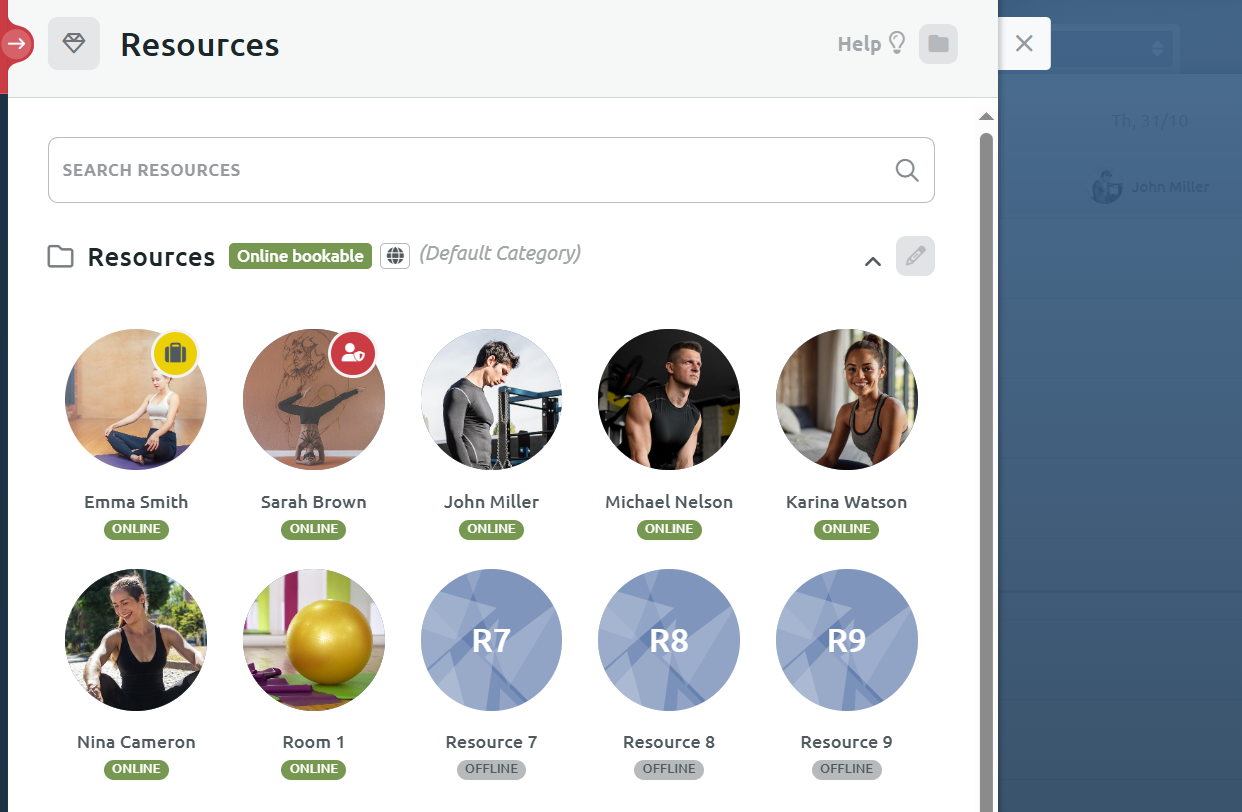
- In this case, each fitness instructor would be a resource.
- Navigate to Management > Resources to set up each resource, their information and availability.
- You can also invite each instructor to become a user of the Timify App. That way, they can manage their own classes.
- The studio would also like to offer the option to rent one of their fitness rooms by the hour. To do this, they add "Room 1" as a separate bookable resource.
- By setting the room’s availability outside of class times, you can ensure there are no overlaps. For instance, if the studio holds classes from 7am to 11am and 1pm to 8pm daily, the room could be available for booking from 11am to 1pm.
Group Services: What classes can the students book?
- A group service is an event at a specific time, which can be booked by more than one person.
- A group service could be a yoga class or a weight lifting class.
- Group services only occur at the times you set (whereas regular services can be booked according to the resource's availability).
How to set up a group service:
- Navigate to Management > Group services.
- Click the + icon to add a new group service, for example a weight lifting class.
- Define the number of participants - how many students can book the class. In this case, the studio has a capacity of a max of 10 students.
- Choose which resources should be available for each service. Instructor Emma Smith only does yoga, but not weight lifting or cardio.
- Click save.
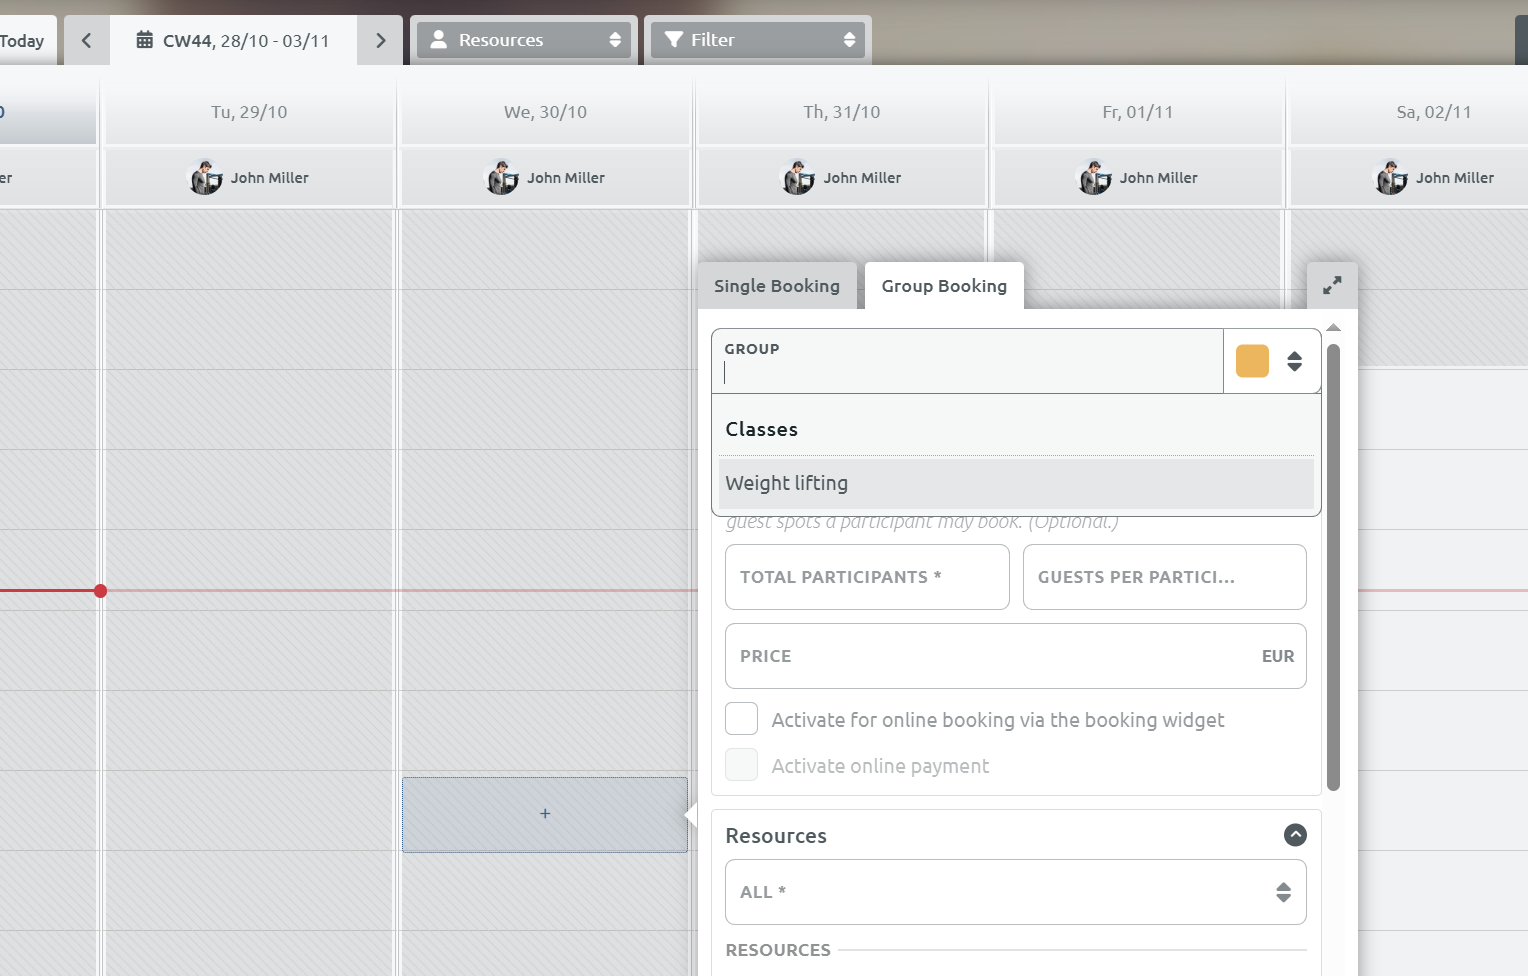
- Navigate to the Calendar of the Timify App.
- Select the time on your calendar when you'd like the group event to occur.
- Under the Group Bookings Tab, in the dropdown, choose the group booking you previously set up.
- You can choose to repeat this event daily, monthly, yearly, or with a custom pattern. Simply toggle the Repeat switch and set your preferred repeat pattern.
Read more about group bookings here.
Services: What other services can the students book?
The studio would also like to create some services that can be booked with the resources, whenever no classes are happening.
For example, someone could book the fitness room whenever it's not in use. Or they could book a personal training with an instructor.
These are set up under Management > Services.
Here, you can create a service called “Book studio” with the resource “Room 1” for students that wish for privacy to do their own practice. This service can only be booked during the availability times set for “Room 1” - for example 11am to 1pm to not overlap with classes.
Setting up payment
For classes, students pay on arrival. However, to book the room, they must pay when they book.
To set up payment, head to Settings > Online Payment. Here, you can set up your account to accept either Stripe or Paypal payments.
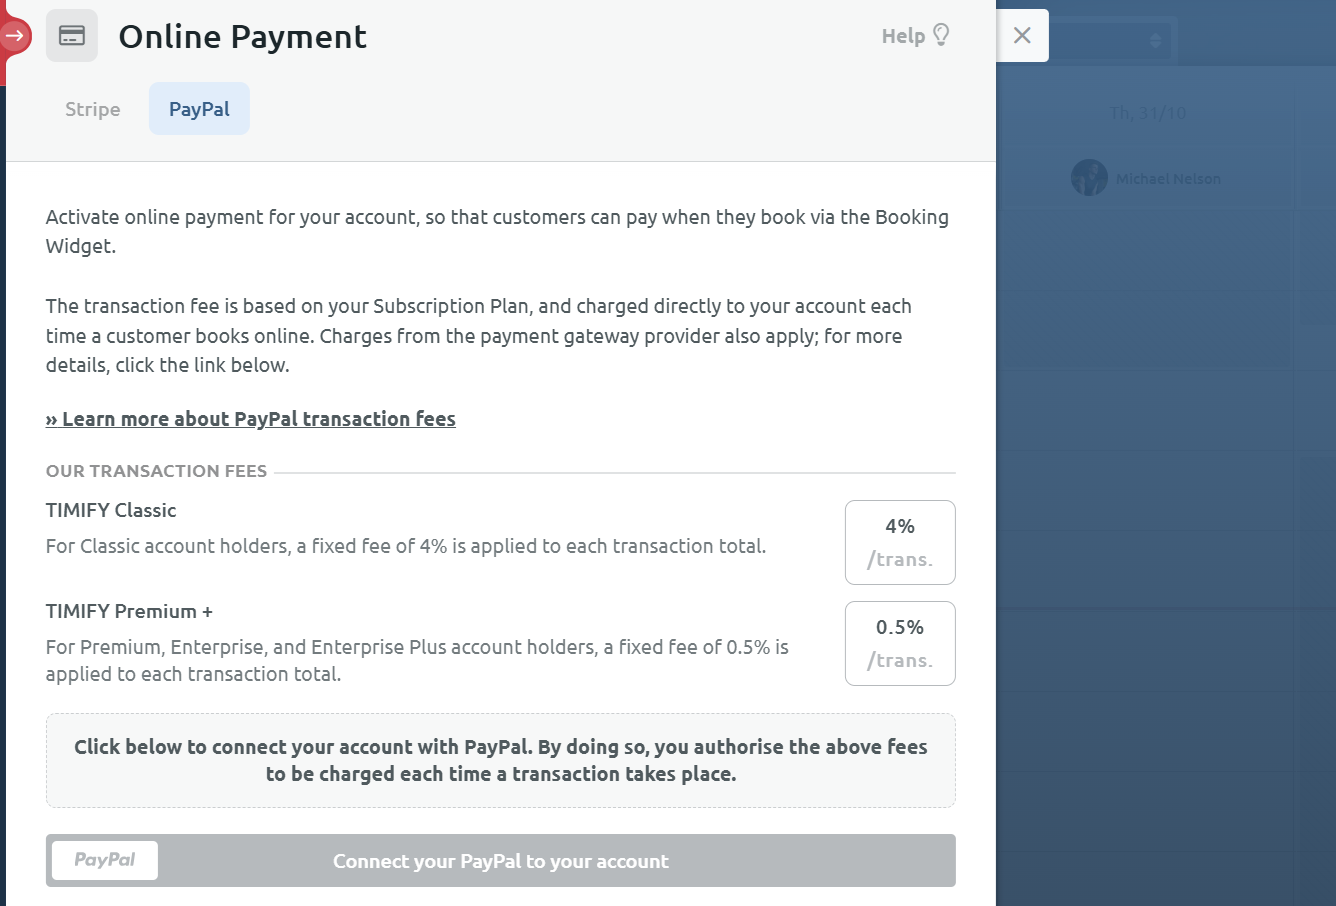
Once a payment method is set up, you can then add it to the service.
Read more about online payments here.
Setting up email reminders
The studio would like to send automatic reminders. Automatic reminders are already set up on every Premium account as per the global settings (i.e. the settings that are defined globally by Mono for all accounts). The Global settings are set to automatically remind customers one day before their appointment.
This can be changed under Settings > System Notifications.
Setting up SMS reminders
The studio would also like to set up SMS reminders. To do so, the Mono Team must enable SMS for them. You, as a provider, must reach out to the Mono Support team to enable this. Once we have enabled it, head to the Timify App store and download Notify.
You pay per SMS set out. SMS is managed through the Notify App via Timify. You can limit the usage of the App to a specific budget. After the limit is reached, you can no longer send more SMS.
Changing the booking slot display
The studio would like a weekly display of the classes instead of daily. They can change this setting under Settings > Bookings > Booking widget.
Booking a class
Let's look at the booking experience itself.
What does it look like when a site visitor books a class online?
First, the visitor clicks the button and a pop-up appears with a list of the classes.
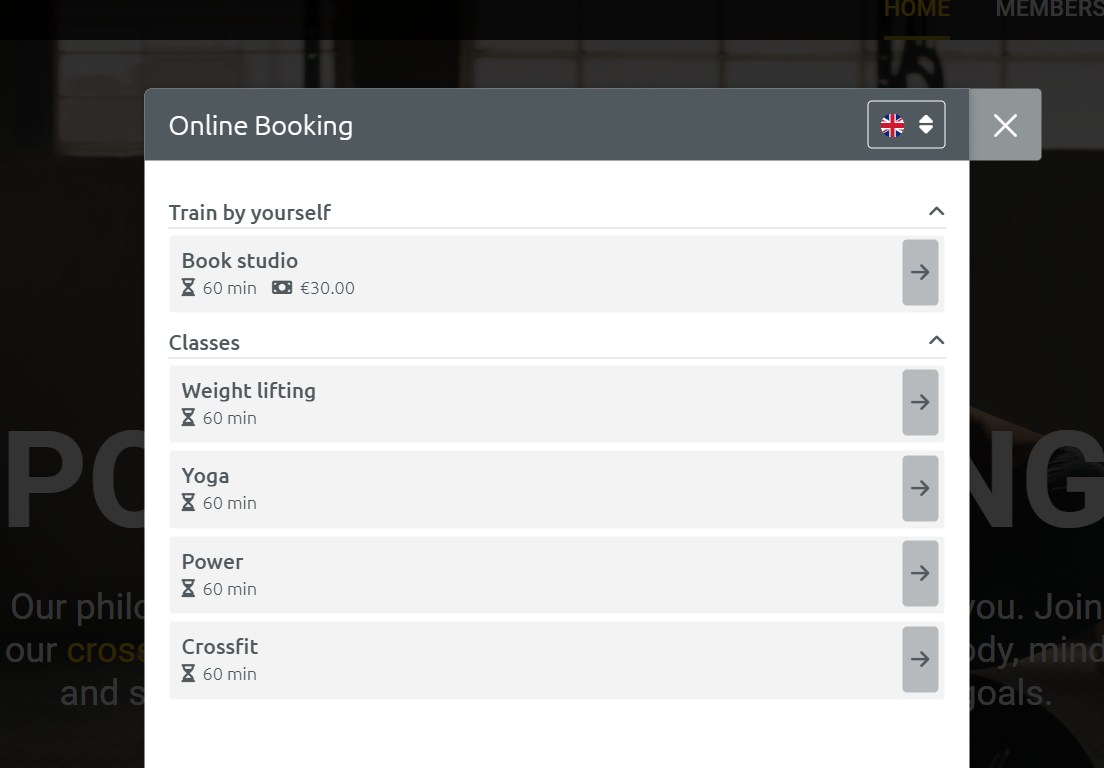
Let's choose a Power class. We get a weekly overview of when we can book this class, and with which instructor. You can attend on Thursdays with Nina or you can attend on Sundays with John.
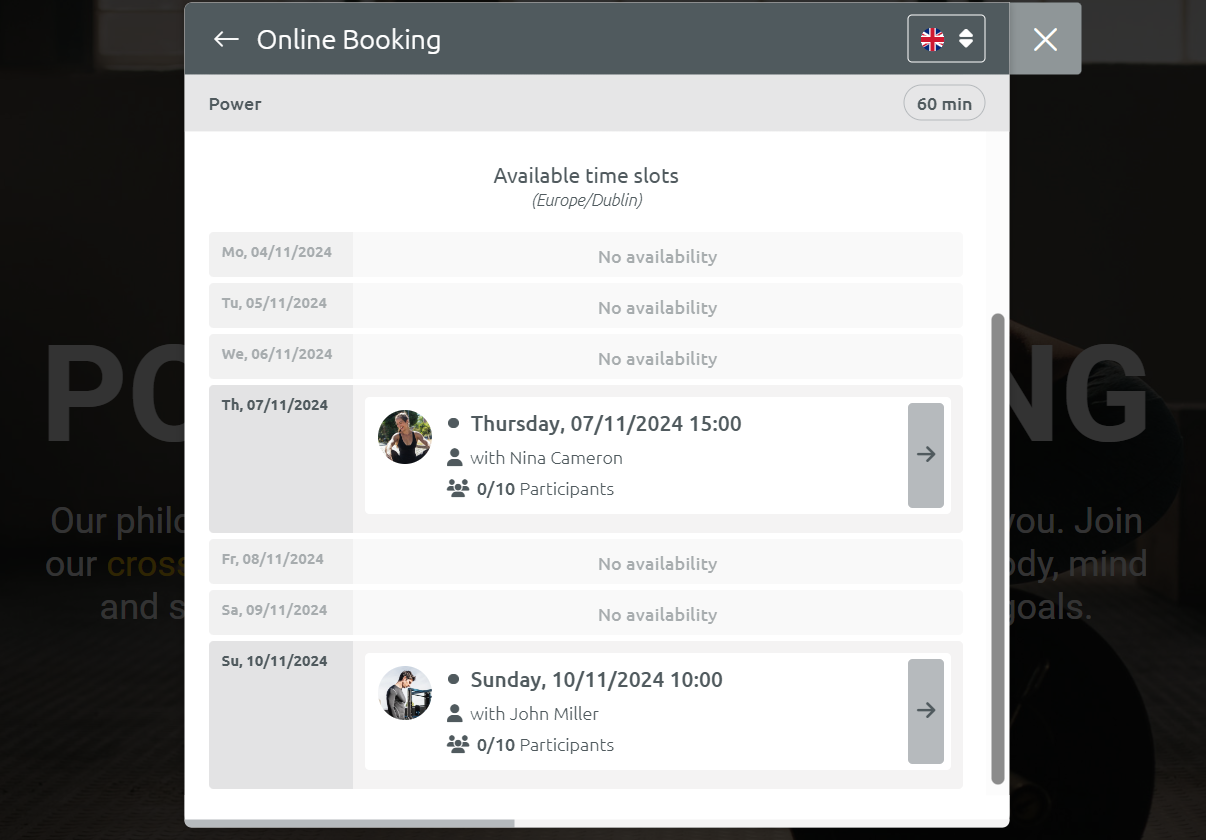
We simply choose which session we would like to attend, and then complete the booking flow.
Final thoughts
Mono Scheduling+ is a well-suited option for SMBs in the health, beauty, and fitness industries. Resources can easily be allocated to the staff members of these businesses, and you have the option to set up either individual services, which can be booked by the hour subject to availability, or group services at specific times.
If you are interested in trying out Scheduling+ for yourself, please get in touch with us at info@monosolutions.com or reach out to your Account Manager to get started.
